Emerging laser applications—New demands on optics
JESSICA DEGROOTE NELSON, Optimax Systems
Talking about optics assumes a well-prepared optical surface—and that was what Jessica DeGroote Nelson, Director of Technology & Strategy, Optimax Systems, talked about: How to make such a surface on an optical component, which is ready for use under challenging industrial conditions.
She went through all the steps from glass manufacturing and surface preparation to various coating procedures and metrology methods. While handling optical surfaces is a very common task in the photonics industry, the preparation of such a surface can go to the limits of what is technically feasible.
It all starts with the optical manufacturing process, where the raw surface on an optical element is created and polished. Polishing or even grinding surfaces deserves its own article, in particular if it is done on nonsymmetric (that is, freeform) optics. Every step in the polishing process must be exactly repeatable and it has to be qualified by precision measurements.
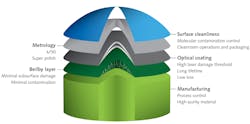
The result is known as the Beilby layer, which describes a thin molecular layer on the surface of the bulk material that has been modified either through the polishing or through hydration of water on the surface (see figure). It can affect absorption, durability, and bonding to coatings that are later deposited on the surface. Contamination and subsurface damage (cracks) depend on the polishing procedure.
Optical coatings are most often brought onto the surface in a vacuum chamber. Coating materials are either evaporated or sputtered from a separate substrate in the chamber. The two most prominently used in many laser systems are the plasma-assisted ion deposition and ion beam sputtering, as DeGroote Nelson explained.
A popular means to test the quality of such a surface is the laser damage test, where a standard beam is sent to a surface until it shows damage. Test data from a blind test at Lawrence Livermore National Labs with about 30 mirrors from various vendors showed damage thresholds differing by more than a factor of 10.
A crucial function in surface preparation is metrology. It must test both surface quality and the deviation to the desired shape. The latter is usually taken by wavefront metrology. The surface roughness is measured by whitelight metrology. Transmission, reflection and absorption measurements give essential data for the optical system: While reflection is the crucial number for handling precious laser energy, it is absorption that may be decisive for the lifetime of the component.
As the quality of optical surfaces is measured on the scale of nanometers, any contamination is critical. And so are cleaning processes during production, as DeGroote Nelson showed on an example. Proper cleaning procedures should create molecularly clean surfaces. Accordingly, any processing is done under cleanroom conditions.
In the end, the applications define the requirements for optical surfaces. Research facilities such as the U.S. National Ignition Facility have created a lot of progress in optical coating preparation, since their demands for high laser damage thresholds are very stringent. Directed-energy weapons or next-generation industrial lasers may have high requirements as well, but as they most often use continuous-wave laser radiation, their challenges are different.
Based on the requirements of the customer, the manufacturer of precision optical components must balance performance, lifetime, and cost. If engaged early in the design process of new systems, they can optimize the production processes and, thus, costs for all optics.
CONTINUE READING >>>
DOWNLOAD FULL REPORT
About the Author
Andreas Thoss
Contributing Editor, Germany
Andreas Thoss is the Managing Director of THOSS Media (Berlin) and has many years of experience in photonics-related research, publishing, marketing, and public relations. He worked with John Wiley & Sons until 2010, when he founded THOSS Media. In 2012, he founded the scientific journal Advanced Optical Technologies. His university research focused on ultrashort and ultra-intense laser pulses, and he holds several patents.

