Wavefront sensor competes with interferometers
A grating-based wavefront sensor has been developed that allows measurement in real time. Developed by Arden Photonics (Solihull, England), the sensor is designed for measuring the form of lenses, flatness of mirrors, and other optical components, as well as the surface shape of silicon substrates and optics.
The instrument, which relies on a so-called image-multiplexing diffraction grating, was developed at Qinetiq (Malvern, England), a science and technology organization that was formerly an agency of the U.K. Ministry of Defense. The technology was originally developed for use in atmospheric adaptive optics; Qinetiq has licensed it to Arden Photonics to exploit for other target markets.
While a standard transmission grating consists of straight lines of differing transmissivity, the image-multiplexing diffraction grating has lines that are arranged in an off-axis quadratic pattern, and is actually a Fresnel zone plate with its axis of symmetry outside the aperture (no closed zones). This geometry introduces a different amount of focus or defocus for each different diffraction order. Measuring the intensity profile of two different diffracted orders in the same x-y plane (with z as the optical axis) produces information from which the wavefront can be extracted.
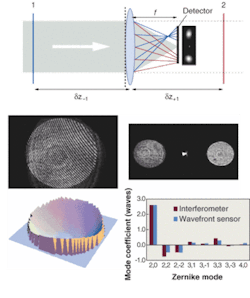
In practice, the system uses another lens in conjunction with the quadratic grating, and the first orders each side of the zero order are captured in a plane close to where the zero-order beam focuses (see figure). The intensity profiles of the two first orders can be measured on the CCD and then analyzed.
A quadratic grating and a lens allow two different planes of a wavefront (along with the focused zero-order beam) to be imaged by a CCD (top). The performance of the grating-based wavefront sensor can be compared to that of an interferometer. Data for the comparison (bottom) include the output from the interferometer (top left), the CCD display from the grating-based sensor (top right) and the intensity difference between the two diffracted orders in the grating-based sensor (bottom left). A Zernike mode analysis of the wavefront from both methods shows good agreement (bottom right).
Any wavefront can be expressed as a sum of Zernike polynomials. Zernike analysis of the beam picks out the Zernike modes from the intensity difference of the two orders measured on the CCD. By obtaining the Zernike coefficients, the wavefront can be reconstructed. The measurement of the wavefront is therefore performed in real time. The measurement does not require a coherent light source and is not sensitive to vibration, which is a drawback of traditional interferometric systems.
The performance of the wavefront sensor compares well to that of an interferometer. Engineers at Arden have tested the two types of systems head to head by introducing an aberration into a wavefront and then measuring identical portions of the wavefront; they claim that the agreement between the two results is excellent.
"This technology offers a robust, real-time wavefront measurement method that we expect will bring valuable benefits to the industry," said David Robinson of Arden Photonics. "It will enable manufacturers of a wide range of precision optical and mechanical products to improve quality by taking high-accuracy measurements wherever they are needed. Typically, interferometers require stable environments and controlled conditions so they are usually consigned to a measurement or standards lab. This new wavefront sensor can measure quickly and in everyday environments, so Arden is targeting it at quality-control and in-process measurements in optical manufacturing and optical alignment."
The company's engineers aim to develop a system for measuring the quality of free-space laser beams. The proposed system will use two diffraction gratings at right angles to each other, enabling nine planes to be imaged onto a CCD array. This arrangement would allow M2 (beam-quality) measurements to be done in a single shot, enabling accurate measurements of pulsed lasers, lasers that are warming up, and lasers in other unstable situations.

