BEAM-PROFILE ANALYSIS: Propagation factor quantifies laser beam performance
Comparing M2 of an actual laser beam to a pure TEM00 Gaussian beam allows beam-propagation characteristics to be accurately predicted.
Carlos Roundy
Many emerging applications of lasers require extremely high TEM00 Gaussian mode quality. These range from scientific experimentsin which the beam must be focused to a very high intensity (or irradiance) for nonlinear processesto industrial processes in which a beam must be focused to the smallest possible spot for such applications as drilling holes in stainless steel.
In the past, a Gaussian fit to the beam profile has been used to evaluate how close the beam is to TEM00. It was shown more than 10 years ago, however, that a multimode combination of beams can have a nearly perfect Gaussian shape.1-3 Thus, a Gaussian fit can deceive a user into assuming propagation properties of a laser beam that will not exist in practice. The Gaussian fit then becomes not only a meaningless measurement, but also one that is deceptivegiving the user a false sense of laser performance.
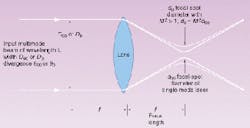
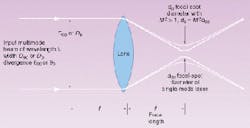
FIGURE 1. Two equivalent input beams that are equal in all other respects will focus to two different waist sizes if the M2 of each beam is different.
If a Gaussian fit does not adequately provide the mode characteristics of a laser beam, what measurement does? The answer is the beam-propagation factor M2. With today's beam-profile-analysis equipment and software, it is easy to identify this parameter, which quantitatively compares the propagation characteristics of the real beam to those of a pure TEM00 Gaussian beam. For a given input beam width and lens focal length, this comparison allows the exact focused spot size to be predicted, as well as the irradiance of a focused spot, the Rayleigh range over which the beam is relatively collimated, and the far-field divergence of the beam. While the M2 concept has been known for many years, the popularity of making this measurement has only recently been catching on in both scientific and industrial communities.
The theory of M2
A common use of the M2 concept is in determining the size of a focused spot when a focusing lens is used (see Fig. 1), as d0 = M2 4lambda/piD0 where l is the wavelength, f is the focal length of the lens, and D0 is the waist width of the input multimode laser beam at the focal length of the lens. This equation shows that the focused spot size d0 is M2 times larger than it would be for a pure TEM00 Gaussian beam of the same input width D0. Thus, for a beam of M2 = 2, the focused spot size is two times larger than would be obtained with a TEM00 beam. The irradiance, which is proportional to the beam width squared, would be only one-fourth of that achieved with a pure TEM00 Gaussian beam.
The focused spot size and irradiance of a laser beam have profound effects in both science and industry. In science, nonlinear processes are typically proportional to the irradiance squared or cubed. Thus, a beam with an M2 of 1.4 (and an irradiance of one-half that of the Gaussian) would have a nonlinear output of 0.25 to 0.125 of a beam with an M2 of 1, all other characteristics being equal.
In the industrial process of very fine hole drilling, a beam with an M2 of 1.4 would drill holes 1.4 times larger than would a beam that was pure TEM00. With the beam irradiance one-half that of a Gaussian beam, the hole may not be drilled to the expected depth.
In both scientific and industrial cases, it is essential for the user to know what to expect from the process. While experimentation is often used to obtain this information, by knowing the M2 of the laser beam, a scientist or production manager can make accurate predictions.
Measurement of M2
One reason the concept of M2 has not been particularly popular is the difficulty of making an accurate measurement. It cannot be determined with a single calculation, as would be possible with a Gaussian fit, for example.
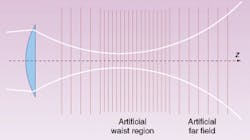
The International Organization for Standardization (ISO; Geneva, Switzerland) committee has defined a methodology that provides for reliable measurement of M2 so that this parameter can be used with confidence by anyone making the measurement.4 The method involves placing a lens of a known focal length in a laser beam, then making a series of measurements through the focused waist of the beam (see Fig. 2). Measurements that are usually essential include the width of the spot at the smallest focus, the position of the spot at focus, the width of the beam at the focal length of the lenswhich may not be the same place as the smallest spotand the divergence of the beam beyond focus. Typically, a more-reliable and consistent measurement is obtainable when the equipment end user makes a series of measurements and then performs a curve fit to the measured data to calculate the M2 parameters from the fit.
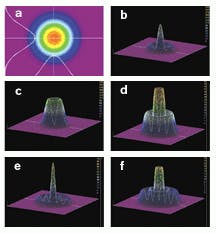
Examples illustrating the contrast between Gaussian fit and M2 are shown in Figs. 3 and 4. In Fig. 3, a computer-generated beam is shown that is composed of several modes.3,5 The beam shape provides an almost perfect Gaussian fit at 0.97, yet the M2 of the beam is 3.3.
Equipment perspectives
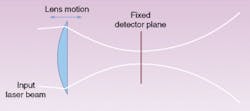
Certain steps are essential to making a reliable and consistent measurement of M2. The first is to perform the measurement as specified in the ISO standard. That is, the lens must be stationary and the sensor moved through the waist of the beam. In some cases, the user finds it easier to hold the sensor stationary, and move the lens in the incoming beam (see Fig. 5 on p. 122). This method is typically reliable when the input beam is well collimated over the range of motion of the focusing lens. If, however, the beam is either diverging or converging over the travel length of the lens, then the M2 measurement can be incorrect and very misleading.
FIGURE 2. The ISO standard defines the method required to accurately measure M2, which is based on a fixed-position lens and multiple beam-width measurements made through the waist.
A second part of the ISO definition is that the width of the laser beam must be measured by the Second Moment method. Spiricon Inc. (Logan, UT) software uses proprietary algorithms to calculate the Second Moment width, which is difficult to do because of nonlaser background signal and off-axis laser light. While there are many other definitions of laser-beam width, including the 1/e2 points and 14% of peak, none reliably provides an accurate evaluation of M2. Some suggestions have been made to enable other types of measurements to approximate the Second Moment width.6 Nevertheless, only the Second Moment beam-width measurement conforms to the laser-beam-propagation equation and is, therefore, the only measurement that provides reliable and consistent measurements of M2.
There are several commercial instruments for measuring the M2 of laser beams. Some use the stationary-detector/moving-lens method described here. Some users are satisfied with these instruments, while others report the results to be inconsistent. As noted, the difference may be whether or not the beam is measured through a collimated section. Some manufacturers report that they have special algorithms to correct for errors in the case of high-divergence beams. Others provide instrumentation that holds the lens stationary and moves the detector, as mandated in the ISO standard. Spiricon provides the fixed-lens type of instrumentation.
FIGURE 3. Simulated composite laser beam (a; M2 = 3.3) composed of 0% TEM00, 16% TEM10, 44% TEM01, 20%TEM11, 12% TEM20, and 8% TEM21 appears Gaussian (fit = 0.97) even though it is composed entirely of higher-mode laser beams The two white cross-section profiles are that of the beam and of the Gaussian fit, which are seen to be almost indistinguishable (b is TEM1,0, c is TEM0,1, d is TEM1,1, e is TEM2,0, and f is TEM2,1).
For unusual lasers that have extremely large beams or wavelengths incompatible with the optics and cameras of commercial instruments, a user typically has to make the M2 measurement manually. In this case, software is available that provides a detailed step-by-step process for making consistent measurements and calculating M2.
Commercial application
FIGURE 4. Real multimode laser beam has M2 of 4.8 but its Gaussian fit is 0.91, so in an industrial application this beam would not perform as well as one with a smaller M2 parameter. PHOTO END The concept of M2 measurement enables both laser manufacturers and laser users to have greater confidence in their ability to predict the performance of the laser beam. In some cases, OEM users are requiring laser manufacturers to measure the M2 on each laser shipped and hold a very tight specification on this parameter.
FIGURE 5. Alternative M2 measurement method, which involves moving the lens instead of the detector, can be reliable if the input beam is well collimated over the range of motion of the focusing lens.
Commercial instrumentation is now readily available for M2 measurement, which makes it much easier for the end user to accurately evaluate this important parameter. Hence, experiments come much closer to meeting the expectations of the laser scientist, and industrial users are much better able to predict what a laser will do in a given application.
REFERENCES
- M. W. Sasnett, The Physics and Technology of Laser Resonators, A. Hilger and D. Hall, eds., p.136 (1989).
- A. E. Siegman, Lasers, University Science Books, Sausalito, CA (1986).
- A. E. Siegman, OSA Trends in Optics and Photonics 17, 184 (1988).
- Test methods for laser beam parameters: Beam widths, divergence angle and beam propagation factor, Document ISO/11146, International Organization for Standardization; available from ANSI at www.ansi.org (Nov. 1993).
- R. D. Jones, Laser Measurements Short Course, NIST, Boulder, CO (1992-1999).
- T. F. Johnston Jr., Appl. Opt. 37(21), 4840 (1998).
CARLOS ROUNDY is president of Spiricon Inc., 2600 N. Main St., Logan, UT 84341-5740; e-mail: [email protected].
