POSITION MEASUREMENT: Laser scales promise jigless assembly
In the production of components that are to form subassemblies in aircraft, it is important to guarantee the accuracy and repeatability of the location of drilled holes. Normally, individual components are set up in large complex jigs to form a complete assembly. Once the components have been manually aligned in the jig, holes are drilled, countersunk, and riveted.
To reduce the complexity and cost of this process, BAE Systems' Airbus factory (Filton, England) embarked on a jigless assembly research project three years ago. The goal was to produce accurately drilled components while saving up to 75% of the multi-million pound investment in manufacturing assembly jigs for new aircraft. Substantial savings also could be realized in existing sub-assembly procedures for Airbus wing and fuselage sections.
Although accurate drilling was the initial target, the project highlighted the need to examine the whole question of machine tool accuracy in more detail. Accurate pre-machining of components eliminates the need for much of the jigging originally designed to position them. Instead, parts can be self-locating and ready for drilling and riveting using simple holding fixtures that reduce assembly costs. To achieve the parts precision required, the company had to control machine-tool accuracy, machine- tool calibration, tolerance budgeting, and temperature compensation. Machine inaccuracies arise primarily from thermal expansion of the machine's mechanical axis position measuring system and of the aluminum part being machined. The company has evaluated a new optical measurement system that compensates for this expansion and provides the accuracy needed for the application.
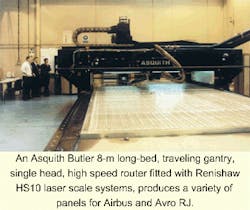
The Research and Technology Group selected an 8-m long-bed, traveling gantry, single-head, high-speed router to evaluate retrofitting with two HS10 "laser scale" units developed by Renishaw, (Wotton-under-Edge, England). The router is normally used to produce a variety of panels for Airbus and Avro AJ (see Fig. 1). The laser scales are fitted, one on the x-axis, tracking the traveling gantry, and one on the y-axis—the 5-m wide gantry bridgetracking the traversing machining head. Signals from these are processed and used as encoders for the machine tool controller. Each laser scale uses a low power (<1 mW) HeNe laser in an interferometer with one fixed reflector and a moving reflector mounted on the moving part of the machine.
The Renishaw system includes a compensator unit with a sophisticated sensor network and it uses mathematical algorithms to compensate for both air temperature refraction and machine and workpiece temperature changes. The compensator corrects the laser position signals in real time, to provide a high level of accuracy in the machined parts. The basic accuracy of the system is ±1 part per million and the resolution is configurable down to 79 nm. It can cope with machine tool feed rates of up to 1 m/s and is designed to be resilient to shop floor conditions.
BAE Systems development manager for manufacturing systems engineering, Colin Mitchell, was pleased with the evaluation. "We bought the laser system with the long-term view of fitting such systems to long-bed machines at our other Airbus site in Broughton," he said. "The Demonstrator panel—a fuselage section—has been very successful, the culmination of some three year's work on a relatively low budget. Renishaw has given us a real-time temperature compensation system. As for realizing the ambitions of our project, we are nearly there. We now understand all the elements and we are confident we can take it into production."
