Robot-mounted optical profiler measures surface roughness
Optics manufacturers rely on high-resolution metrology. They need to assess the overall shape, mid-spatial frequency errors, and roughness of the components they manufacture. Large optics, and optics with complex shapes, present unique metrology challenges.
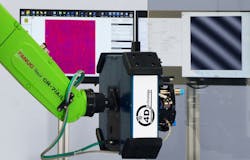
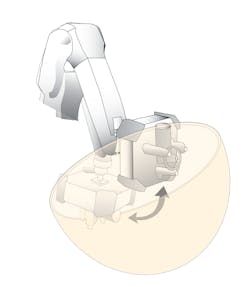
Traditional metrology instruments have been highly susceptible to environmental noise and vibration, requiring large, heavy isolation structures, which preclude cost-effective measurement of large or complex parts. New advances, however, have led to the development of instruments that are immune to vibration, allowing them to be mounted on robots or other automation for noncontact, 3D, high-resolution roughness measurements in production environments (see Fig. 1).
Measuring optics with large diameters or complex shapes
The growing size and complexity of optical components pushes the limits of manufacturing capabilities and metrology. As an example, the large primary mirrors for ground-based telescopes can exceed 8 m in diameter. Even larger mirrors are assembled from hexagonal segments of 1 m or more in size. In other applications, such as surveillance, research, and defense, large optics may be required to image at functional wavelengths well into the infrared. These components may be polished to supersmooth and even ultrasmooth (sub-Angstrom) finishes over the entire clear aperture.
In addition to larger sizes, more complex shapes also add challenges for roughness measurement systems. Highly curved optics, such as radar or missile domes, require exacting metrology to ensure image quality. Aspheric and freeform optics also bring unique challenges. To control polishing processes, manufacturers measure surface texture before and after polishing steps. The most frequently used measurement technology is optical 3D profiling. This interferometry-based technique provides rapid, noncontact roughness measurements on surfaces with subnanometer height variation.
Optical profiling, like many high-resolution measurement technologies, is subject to environmental noise and vibration, which degrade measurement quality or prohibit measurement altogether. To overcome this limitation, optical profilers have traditionally been mounted to highly rigid frames, often with heavy granite slabs floating on pneumatic, vibration isolation pistons. These structures sufficiently limit environmental noise; however, they also constrain the size of test components to just inches, or tens of inches, making it infeasible to measure larger optics.
Moreover, because of the noise and vibration of most production environments, high-resolution measurement systems like this have traditionally been relegated to metrology labs in isolated areas of a facility in order to limit the impact. Long queue times and more handling greatly increase the production cycle times and the risk of damage—particularly for very large, expensive optical components. Some components are simply impossible to move from production to a metrology lab.
Dynamic measurement enables production roughness measurement
In the last decade, vibration-immune “dynamic” optical profilers have been developed that can successfully measure roughness even in noisy environments. In a dynamic system, all of the data necessary for a phase measurement are acquired simultaneously, rather than sequentially as in traditional systems. Because the acquisition time is so short (less than 100 µs typically), these instruments are effectively immune from vibration and environmental noise.
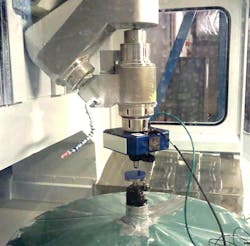
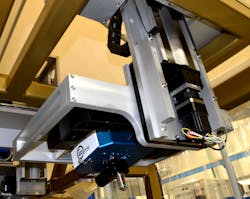
The advent of the dynamic profiler has enabled high-resolution metrology in situ on the shop floor at the point of manufacturing. Moving the metrology into the production area has eliminated much of the queuing time and material handling associated with equipment in metrology labs. Dynamic profilers can even be mounted directly in polishing equipment for rapid polishing feedback and minimal cycle time, while keeping the blank in place for further polishing as needed (see Fig. 2).Measuring large optics
The challenge of measuring roughness on large or complex optics is primarily in the positioning. Measuring the overall form of a large mirror can be accomplished by placing the measurement system far from the optic (in a tower, for example). Measuring roughness on the nanometer scale, however, requires the profiler to be mere millimeters from the surface—without damaging the fragile surface of what may be a multimillion-dollar component.
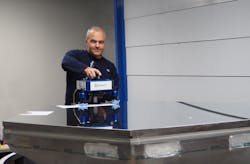
One option made possible by the dynamic profiler is to place the optical profiler directly, and carefully, on the optical surface (see Fig. 3). This arrangement has limitations, however. Repositioning and refocusing the instrument at each location is time-consuming, which limits the number of measurements that can be practically made in a timely fashion.The result is that the quality of the surface must be extrapolated from a limited set of data points. Furthermore, when the diameter of the optic exceeds even a half-meter, it may be difficult for an operator to safely move the instrument to all locations on the surface. Lastly, measurements at the edges of the optic may require additional fixturing or may not be possible at all. This becomes a particular challenge for large hexagonal mirror segments, for which the clear aperture extends close to the edges and vertices of the component.
Incorporating automation
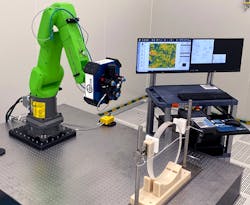
If it is insensitive to vibration, an optical profiler can measure effectively while mounted to an automated positioning system. Mounting a profiler on a robot arm, overhead gantry, or other automation yields a number of benefits:
Other dynamic profiler applications
An automated, dynamic optical profiler is ideally suited for measuring highly polished large mirrors and mirror segments. Other optics applications include x-ray components, laser amplifier slabs, laser gyroscopes, aspheres, and some freeform optics.
An automated system can also be used to measure components arranged on a conveyor belt or presented on a tray, automatically correcting for alignment in order to measure each component. In the semiconductor industry, profilers find applications in measuring wafer roughness and identifying patterns chip to chip.
Sub-Angstrom roughness measurement
One growing segment of optics research is the development of processes that can provide supersmooth or ultrasmooth finishes, with roughness on the sub-Angstrom scale. By rapidly acquiring and averaging multiple measurements, an optical profiler is capable of providing polishing feedback for this next generation of optics.
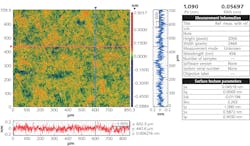
Measurements acquired with an optical profiler (see Fig. 7) show a false color map of roughness on a supersmooth mirror. These measurements are more effectively completed with a more stable platform such as a surface-contacting tripod because robots and gantries are incapable of providing sufficient stability for this degree of vertical resolution.Optical profiling is well suited for measuring both large and complex optics, providing noncontact 3D roughness data with sub-Angstrom precision. With the addition of automation handling, an optical profiler can access all points over a very large or highly curved surface, providing excellent feedback for polishing processes and final part acceptance.
About the Author
Mike Zecchino
Technical Communications, 4D Technology
Mike Zecchino is in technical communications at 4D Technology, Tucson, AZ.
