Imaging system uses prism to work fast
Incorporating news from O plus E magazine, Tokyo
TOKYOThe Network and Alliance Business Associates Corp. has marketed an imaging spectroscopic system that uses prism spectroscopy to simultaneously measure 240 points of wavelength and position information. The system analyzes a wide range of color and spectrum phenomena, including CIE (Commission Internationale de l'Eclairage) chromaticity grid indication over many points, and the analysis of spectroscopic reflection rate, transmission rate, and absorption rate. This type of analysis is crucial for color displays and color ink-jet printers.
In the past, the standard method of measuring color or spectra has been by recording with a red-green-blue color camera or by doing spectroscopy on every point. The former method lacks precision because the color is determined using only three wavelengths, while the latter method requires an exhaustive amount of time because only one point at a time can be measured. Displays work with moving images, however, so the measurement and analysis of an entire surface cannot be avoided.
There are spectrometers based on diffraction gratings. But because light is collected after diffraction, its intensity is reduced. To maintain high measurement precision of the wavelength, high-sensitivity charge-coupled devices (CCDs) and expensive photodetectors are required. To reduce such problems, the new method uses prism spectrometry, which boasts a transmission rate of greater than 80%.
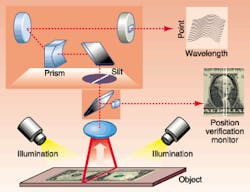
The light emanating from the object (spontaneous emission, transmitted light, stimulated emission, or others) is directed into a 5-mm x 50-µm slit and then dispersed using a prism (see figure). It is then redirected by a reflective mirror that corrects image distortion on CCD surfaces. The CCD has a standard cooling setup. In this device, zero-order light enters the CCD so that not only is measurement precision higher, but the entire system can be constructed at low cost. In addition, by connecting standard macro lenses, telescopes, or microscopes to the image-formation optical system, spectral analysis and chromatic analysis can be executed from microscopic to macroscopic scales.
An example measurement was performed to analyze the impurities in a sheet of paper. Both the paper itself and the impurities can be measured simultaneously, and the results for the paper and paper impurities can be compared on the same X-Y chromaticity grid. In addition, by assigning a color code to the spectral classification, the code distribution can be mapped. Therefore, the apparatus is well-suited for recognizing objects or defects and impurities within objects that have a distinct wavelength profile. The range of possible applications is wide, including testing parts for displays, adjusting light sources, measuring color distortion, and monitoring projector colors. The spatial resolution is at the submicron level, so cells can be analyzed to detect diseases as well.
Other novel detection uses also are under investigation. For example, prosecution for hit-and-run accidents has increased in recent years, and one of the key pieces of evidence in such cases is the color of the car. Until now, professionals in the field have spent a great time of time and effort to distinguish colors by eye. By using this system, subtle variations in color can be distinguished even if the painted surface is damaged. In addition, the spectrum can be mapped, thus facilitating the quick matching of cars on the basis of their paint profiles.
Courtesy O plus E magazine, Tokyo

