Prism coupling measures refractive index of GaN compound semiconductor
Reliable and economical fabrication of blue as well as ultraviolet light-emitting diodes (LEDs) and blue-emitting diode lasers based on currently available material systems will require accurate and repeatable measurements of birefringence and indices of refraction in gallium nitride (GaN) and related alloys. This is particularly true in the case of LEDs, which require very precise design and fabrication in order to extract every available photon produced by the device, according to Norman Sanford, a researcher in the Optoelectronics Division of the National Institute of Standards and Technology (NIST; Boulder, CO).
Obtaining such accurate measurements of refractive index has not been easy, however, partially because of related factors, such as birefringence and material composition that must also be accurately measured and calibrated. Upon considering the large lattice mismatch between GaN and the sapphire substrates on which it is typically grown, as well as the resulting highly strained films and defect densities, a lack of consistency in index-measurement results is not surprising.
"There's been a lot of controversy in the literature regarding what the material composition is and then what the index and birefringence at that composition turns out to be. So most people have used direct and straightforward x-ray diffraction and then assumed a particular calibration between the lattice constants and the aluminum mole fraction," Sanford said. "It turns out that that's inaccurate because of the peculiarities and the strain of the material."
Consequently, Sanford, along with NIST colleagues in Gaithersburg, MD, researchers from the University of California, Santa Barbara, and from TDI (Gaithersburg, MD) have conducted a slew of comparative measurements with the intent of ultimately providing widely usable calibration standards.
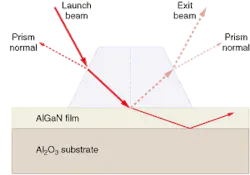
They used prism coupling to measure indices of refraction at discrete wavelengths ranging from 442 to 1064 nm in aluminum gallium nitride (AlGaN) films grown on sapphire substrates by hydride vapor-phase epitaxy and metal-organic chemical-vapor deposition. They also correlated the prism-coupling results with curve-fitting analysis of a complementary measurement method—spectroscopic reflection and transmission—to come up with indices of refraction as a continuous function of wavelength from 250 to 2500 nm. Energy-dispersive x-ray spectroscopy analysis (EDS) was used to measure the mole fraction of aluminum in the AlGaN samples.
"We combined the x-ray work with EDS, which we believe is calibrated very well to obtain the best measurement of aluminum mole fraction today," Sanford said. "Then we used that to not only calibrate the x-ray measurements, but to also directly compare aluminum calibration with the refractive index and birefringence, which we measured by two complementary methods—prism coupling and spectroscopic reflection and transmission. We then fed the collection of data to Sellmeier equations to make the results useful for engineering applications."
Even though an engineer can plug coefficients defined by aluminum concentrations into Sellmeier equations to come up with refractive indices, the work is far from done. "There is a huge scatter in the results, comparing what we get to what has been published before." Sanford said. "There is very little agreement across the board." LED manufacturers have reviewed the NIST data and responded that it appears to deviate from measurement results that they have purchased.
"I can only guess that they had contract work done perhaps using ellipsometry to measure refractive index," Sanford said. "Although ellipsometry is routine for measuring this material, it's quite problematic because one has to postulate the existence of thin regions of the material near the growth interface that have a variable refractive index and or a significantly different refractive index from the bulk film." With these sorts of features present, ellipsometry does not readily provide accurate, direct measurements of sample thickness independent of refractive index without the use of destructive methods such as cross sectioning.
The NIST researchers can fit their prism-coupling data without the need to postulate regions of variable refractive index, Sanford added. But they have observed inconsistencies in their solution procedures that could be reconciled by a thin interface region on the order of 5 to 10 nm thick. "This basically brings up the issue that a very careful study has to be done on a select group of control samples grown by various methods, and then all three of these methods, ellipsometry, prism coupling, and spectroscopic transmission reflection, need to be reconciled," he said. "Gallium nitride has a long way to go before it is of comparable quality to related optoelectronics materials like the gallium arsenide compound semiconductors."
