How AI reduces laser joining costs
It all started with a design request in a German factory of a U.S.-American car manufacturer. In the previous model of the middle-class car, the side wall and roof were connected with some weld points and covered by a trim strip—but in the new model, the design would omit the strip. In addition, the production team planned to focus on digitizing its processes. Without the cover strip, the weld seam is visible to the customer, so it had to meet the high quality criteria for visible seams.
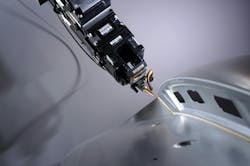
This led the project team to laser joining, or more precisely, to laser brazing. They looked for the technologically most sophisticated solution and found Scansonic, which offers its ALO4 tactile-guided laser optics as well as a camera system for in-process observation of the weld seam. It allows for an in-process evaluation of the seam, and it can use artificial intelligence (AI) to do so—as they found out later (see Fig. 1).
The AI-ready laser processing head
Over the last two decades, Scansonic has built a strong reputation as a supplier of laser optics for automotive applications. The company now has more than 7000 laser optics in the field for laser joining, cutting, and coating processes. It set standards in joining processes by using filler wire for tactile seam tracking. Today, with the ALO4, the fourth generation of such laser optics is again popular with all major car manufacturers.
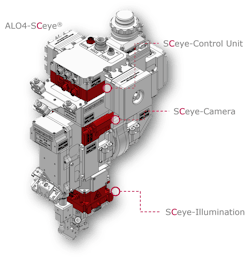
Since 2017, Scansonic’s laser optics feature a machine vision system, named SCeye. It consists of a fully integrated illumination module and camera, as well as a control module inside the laser head (see Fig. 2). This high-performance optics package with an integrated process control system convinced the manufacturer to vote for Scansonic—but with some edge computing, this system can do much more than just visualize the process.
Similar to robots taking over manual labor in production, the AI in the edge computer takes over human tasks in process control. In fact, the team at Scansonic developed an AI system that identifies defects such as splatter or pores in videos of the laser brazing process, captured with the SCeye system. Once identified in the video, the defects need to be found by the operator. Therefore, it presents a photo of the problem so that the operator can decide upon repair of the defect.
The learning curve within the project
The whole adaption of the process control technology at the car manufacturer’s site took 18 months. For immediate quality control, the team from Scansonic suggested use of their new AI system. This produced a lot of data that needed efficient data management: First, they needed to make a decision about standards for data handling to ensure efficient data processing in the factory as well as back at Scansonic. Then, they developed a dashboard to visualize the data to the operator. With data management, the project team had a steep learning curve.
The main task was introducing the new technology into the production system; today, the data from the laser sensor is integrated. In this way, the defect data is assigned to a specific car. The operator gets a note from the AI system if a defect is detected, and can then check the related image on the dashboard or on the workpiece. This allows a rapid decision what to do next with this particular car—phase out for repair or grinding, or keep it in the pipeline for next steps.
With the automated detection of defects, there was another immediate benefit for the team. After the first successful phase, the customer wanted to detect even smaller features; in fact, they went from 0.5 mm defects to 0.2 mm. This is barely visible to the naked eye. Obviously, defects that must not be visible to the car owner are also difficult to detect by a person in the production process. At this point, the machine vision process has better resolution than a human eye and offers more reliability.
This early warning saves time and money in production: If the failures are due to deviations in the process, the settings can be corrected before further bodies are wasted.
AI in production
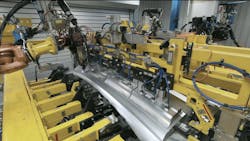
Every day, 600 cars roll off the production line in this modern factory. A robot places the roof on the body, and then another robot moves the ALO4 laser brazing optic along the seam and brazes the parts together. Due to the optical design of the ALO4 and its ability to “feel” the process via the fed brazing wire, the laser beam and the wire always hit the right position in the seam. This results in a high-quality brazing seam with a smooth and attractive surface.
By looking at the surveillance camera inside the laser cell, the operator sees only a light sparkle from the monitor, and can switch to the camera’s vision where the seam is visible right after the laser brazing process. The AI follows all those tiny details and identifies every deviation. With the automatic failure detection, it classifies any point or blur into pores, holes, or good seams in real time. When the parts are joined, the laser box opens and the car body moves to the next station (see Fig. 3).
For long-term quality control, all SCeye videos of defects are stored with the data of each car, its materials, and tool settings. This way, the process can be tracked and current issues even compared with cars that have shown similar problems weeks ago. For the user, the new technology fits also very well into their efforts of a fully digitized workflow. All data is traceable, and processes can be optimized. It also allows understanding of problems in subsequent processes such as grinding.
Another benefit of the SCeye system will be in process stabilization: The growing digitization of processes leads to shorter setup times. The team needs less destructive testing and gets a better understanding of the processes as a whole. Setting up this process took about 18 months; given the learning curve, this phase is expected to be reduced in the future. In the meantime, four systems are installed that have been taught with the same data.
The systems work similarly, but each operator does some finetuning on the process and this may influence the perception of defects. Individual settings such as illumination, angles, or laser settings often differ from one place to another, so there are small differences in the images. That became visible during rollout. Still, the adaption effort is limited, and each transfer is faster than the one before.
AI details in laser process control
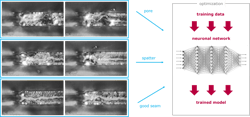
Essentially, the new process control system follows the human experience. Just as a human would learn from samples of good and bad parts, the developers fed data from existing defects plus their classification into a neural network. This kind of training of the neural network is called machine learning. For process control, a neural network gets images from welded or brazed seams and finds out if the pattern in the image contains spatters or pores. This analysis of the incoming images is called inference. If a certain pattern of spatters or pores is found, it marks them for the operator.
How does such a convolutional neural network (CNN) work? In a simplified picture, it consists of several layers where the input data (here, images from welding or brazing processes) are multiplied with certain numbers (weights). The data is sent through several such layers and the result is compared with the classification of the training data (see Fig. 4). If the result matches with the classification, then the weights are good. If not, the weights are varied until the result matches with the given classification. This way, the machine learns to connect the defects with a certain pattern that matches to a certain failure class, such as pore or spatter.
After such a learning process, the CNN can be fed with data it hasn’t seen before. By a certain probability, it will deliver the correct classification; again, weights can be optimized. This is a validation phase where the developer checks how well the trained parameters work on validation data. The training ends when the validation error is minimized.
In a next step, the performance of the CNN can be tested with entirely new data—the so-called test phase. Figure 5 shows a set of detected defects. It should be noted that the CNN has been trained on two classes, “pores” and “spatters.” It can be trained to any other class of defects, too. In a future version, separate neural networks for each class of defects might be considered at Scansonic, which would probably raise the detection rate. For now, the two defect classes are identified by one CNN in real time.
More details of the learning process
For a high probability of correct defect identification, the teaching process is very crucial. The customer provided around 5500 images of good welds and 2000 images of pores for a first training of the system. Scansonic could prove in its laser laboratory that only a few new images were needed to adapt the good results to other processes. With only a couple-hundred images, recognition rates of more than 95% could be realized for brazing processes that differed slightly from the brazing process of the car manufacturer’s series production. The difference was in the used materials and in the used process parameters. However, even when transferring the AI recognition approach to complete other laser processes such as laser welding of aluminum, it shows up that a re-training with only a few images could generate very good results for this new process.
Nevertheless, the reduction of the amount of training data that is needed to train the system for a new detection task is a big topic for the future improvement of this approach.
Outlook
With this customer, experts from Scansonic first used the neural network on one manufacturing line, then on a second. There was a learning curve when transferring from one machine to the next. At the time of writing, the Scansonic experts were installing the AI system for a new customer at three sites in parallel.
In fact, Scansonic has more than five different customers testing the AI system (see Fig. 6). Today, every application is trained on its own. A future way of making the AI approach much more powerful could be to combine training data of different applications. As each application will provide different training data as input and adds new problem cases, the AI will be trained with different applications to generate a highly sophisticated model that performs best on all applications. In this future approach, each customer who is willing to submit its training data will benefit from the best trained AI system. In the long term, a database could be generated that no longer requires training. Of course, data privacy is strictly regarded; if required by the customer, all data can be kept at the actual production site.
Another improvement will be the enlargement of the AI approach; so far, only images have been used. In the future, it may be possible to add data from other detectors, such as process emission or process parameters. This would also enable a better understanding of where a defect originated. The operator would have easier access to process optimization, which opens the door to another strategic goal: once the picture of process data and the occurrence of defects is more complete, another AI could suggest perfect process settings to the operator, or simply control the entire process. Closing the control loop is already on the long-term agenda of the laser head developers.
About the Author
Christian Petersohn
Christian Petersohn, Ph.D., is senior software developer at Scansonic MI (Berlin, Germany).
Michael Ungers
Michael Ungers, Ph.D., is product owner at Scansonic MI (Berlin, Germany).
