Novel laser-based powder bed fusion processes for next-gen electrical drives
A consortium of researchers from the University of Stuttgart, Karlsruhe Institute of Technology, and Aalen University of Applied Sciences are exploring the design, simulation, and manufacturing of a new generation of electrical drives.
The project, ADDSUB, is thematically oriented around the novel combination of additive and subtractive laser processes. For electrical drives, laser-based powder bed fusion of metals (PBF-LB/M) offers a higher degree of design freedom to maximize torque and efficiency over traditional motor designs, which use stacks of sheet metal. To reduce iron losses within additively manufactured components, internal hollow structures are needed to minimize eddy currents. These structures form an isolating barrier by physically separating the material, while the missing volume of flux conducting material should be minimal.
To overcome the limited feature size of conventional PBF-LB/M, the consortium pursues two different approaches. One aim is to produce microscopic hollow structures by specifically tuning the parameters of the additive process to force the formation of a grid-like structure. A second aim is to integrate an ultrafast laser source into the system, enabling in situ ablation processes. This combined system is used to create narrow slits in the built-up material, yielding voids with high aspect ratios through a multitude of layers. First results offer interesting new insights into the fundamentals of both processes and promise new possibilities in other fields of application beyond the scope of this project.
Process-related grid structures
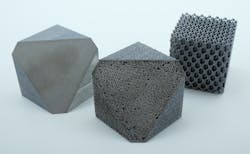
The approach of additive manufacturing small hollow structures is a targeted adjustment of the process parameters in PBF-LB/M, as pursued by the Institute of Production Science (wbk) at the Karlsruhe Institute of Technology. This makes it possible to produce lattice structures from individual weld tracks without having to design them in computer-aided design. As a result, smaller cavities are possible, while the model complexity increases only slightly. The influence of the model complexity is particularly evident in the calculation time required for slicing the individual scan paths. While the calculation of paths for a lattice cube can take up to 20 minutes, the calculation on the same system for process-related lattice structures for a cube with the same edge length requires only about two minutes. Examples of these structures are shown in Figure 1.
The process principle has already been demonstrated on the cast aluminum alloy material AlSi10Mg. For the adjustment, the shape of the weld tracks must be known. Depending on the line energy (LED; that is, laser power per scan speed or energy per unit length) and the powder layer thickness, different weld track shapes are formed. Three different shapes of weld tracks can be distinguished, depending on the connection between the melt and the solidified layer underneath. At high LED values and low layer thicknesses, the laser melts the powder as well as the underlying layer to form a stable weld track. If the LED value is decreased, the underlying layer is melted less, which reduces the adhesion of the melt to the layer. To achieve a lower energetic state, the weld track contracts in some places, which reduces surface stresses. This form is termed humping. If adhesion further decreases, the weld tracks contract and form individual spheres, which is called balling.1
If stable weld tracks with a thickness equal to that of the powder layer are fused and the scan vector distance is greater than the width of the weld track, 3D interrupted structures are formed. An interrupted structure in the direction of deposition occurs because the melt contracts before solidification to relieve the surface tension of the melt pool. Only at the intersections of the weld tracks in the buildup direction is there contact to the weld tracks of the underlying structure, which is why the melt cannot contract here in a detaching manner. The aim in researching the principle on the material AlSi10Mg was to set the total porosity, derived from tree and bone structures, to approximately 50%. This allows foam-like structures to be created in additive manufacturing, which are used in conventional manufacturing for lightweight bending-resistant structures or damping properties.1
The principle described above was applied to the soft magnetic material pure iron, but with the aim of making the size of the structures as small as possible and less porous. To this end, the weld track shape was newly determined as a function of LED and layer thickness for the new material. Initial results, in which the layer thickness and scan vector spacing were reduced, show that samples with a cavity size of 140 to 150 µm and a porosity of 40% can be produced.
System design for combined laser processes
The Institut für Strahlwerkzeuge (IFSW) at the University of Stuttgart takes a somewhat different approach. In this case, additive and subtractive laser-based processes are combined on a single laser machining station to produce previously unattainable filigree, internal hollow microstructures. With this process, slit geometries the width of a human hair have already been demonstrated in additively manufactured components.2 These slits have a width of approximately 50 µm and can extend over any number of layers, enabling previously unattainable aspect ratios. An animation of such a combined process can be found on IFSW’s YouTube channel.3
The laser machining station includes a powder bed—a custom-built unit from the LaserApplicationCentre (LAZ) at Aalen University, a galvanometer scanner with a f-theta lens, and two processing laser sources. Both sources emit at the same wavelength of 1030 nm and can therefore use a common optical path. Depending on whether an additive or subtractive process is to be carried out, the corresponding path is activated within a few hundred milliseconds. All subsystems are controlled via a single computer numerical control (CNC) unit.
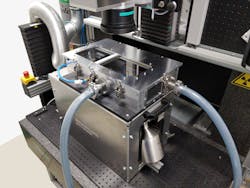
An important part of the project is the development and construction of the powder bed and gas circulation system for combined additive and subtractive laser processing, a task within LAZ’s field of expertise. For experimental investigation, a compact and transportable processing unit was developed and built with the important features of an industrial and scientific system for additive manufacturing. The processing unit offers flexible adaptability to different laser systems and can be easily integrated into the multi-laser machining station at IFSW (see Fig. 2).Special attention was paid to the design of the encapsulation of the build chamber. Any oxidation of the soft magnetic materials during processing can lead to a weakening of the magnetic properties, which must be avoided. The fully automated powder bed processing unit features a high-density, inert gas-fillable build chamber with associated gas circulation and purification. The processing unit is equipped with sensors for monitoring and control of the gas atmosphere. These include an oxygen sensor, flow and temperature sensors, and a filter condition sensor.
The build space allows the production of complex components with a maximum diameter of 100 mm and a height of 100 mm. Modular design of the processing unit enables simple adaptation of further individual sensor technologies for monitoring the additive and subtractive laser processes. One requirement of these processes was the use of laser scanner optics with focal lengths of less than 200 mm to generate small structure sizes with high spatial resolution. This, in turn, presented special challenges to the development of the powder bed processing unit in terms of its design to fully protect the laser entrance glass from spatter and smudge deposits. The design and configuration of the shielding gas flow within the closed build chamber played a critical role in reliably protecting the glass from process emissions.
In contrast to purely additive processing, subtractive processing with ultrafast lasers generates additional process emissions with a wide spread of particle sizes. Their deposition on the additively printed layer and the surrounding powder material must be reliably prevented. For this purpose, the inert gas guidance system with integrated long-term stable filtration system was designed to keep the processing surface free of contamination during the combined manufacturing process.
Additive and subtractive combination
Using the aforementioned system, a test sample was produced from soft magnetic pure iron powder with three slits of different widths showing the main characteristics of the process and its possibilities. To produce this sample, a continuous-wave thin-disk laser was used to melt the powder with an average particle size of 35 µm. An average laser power of 400 W was used in combination with a scanning speed of 1 m/s, yielding a weld bead width of 200 µm. The height of the individual layers was 50 µm.
During the process, the powder bed was flushed with nitrogen. Between layer welding, the beam source was switched to an ultrafast laser, allowing for precise material removal through laser ablation. For the slit production, lines were ablated with an average power of 30 W and a scanning speed of 3 m/s. The pulse energy was 100 µJ, and the pulse duration was approximately 8 ps at 300 kHz. The alternating additive and subtractive process steps were repeated for a total of 150 layers, resulting in a cuboid sample with a height of approximately 7.5 mm. The 10 final layers are solid. As a result, the small hollow structures are fully enclosed within the sample.
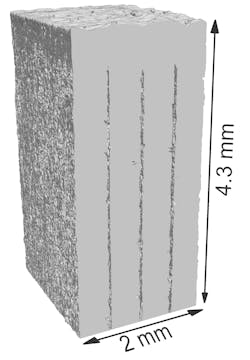
Figure 3 shows a CT scan of the upper section of this sample. Furthermore, a cross-section perpendicular to the scan direction of the ablated lines was added. The average width of the smallest slit on the left was 40±10 µm. Even though the slit width is slightly larger than the average particle size of the powder, no residual particles were found within the slits.Despite the geometry’s simplicity, this discovery pushes the limits of what is possible with any post-processing. For example, aerospace components could be produced with a large number of microscopic cooling channels. Furthermore, these hollow microstructures could also be used for fluid transport—for example, for the lubrication of functional surfaces inside complex parts.
As of yet, no principal limits for the achievable aspect ratio were discovered. This remarkable discovery suggests that this novel combined process can, to some extent, create thin, empty cavities and eliminate the need for openings for subsequent powder removal. Future research will aim to incorporate the controlled ablation process, as this has already proven useful in the post-processing of additively manufactured parts.4 Based on what has been demonstrated so far, the in situ application of this technology will expand the possibilities even further.
These preliminary results reveal great potential in investigating new process strategies for additive manufacturing. The combination with subtractive laser-based processes pushes the limits of geometrical freedom and minimal feature sizes. Integration of both processes on the layer level is mandatory to fully exploit the benefits of precision and accessibility. In the next step within the ADDSUB project, the partners aim to translate the results from fundamental experiments to soft magnetic components of electrical drives. For this task, synergies are being created with other research projects of the Innovation Campus Future Mobility (ICM), in which competences from the design and simulation of electrical drives can be fruitfully connected with novel laser-based manufacturing technologies.
ACKNOWLEDGMENT
The authors would like to thank the Ministry of Science, Research and Arts of the Federal State of Baden-Württemberg for the financial support of the projects within the Innovation Campus Future Mobility (ICM).
REFERENCES
1. V. Lubkowitz, J. Alber, and F. Zanger, Materials, 14, 21, 6665 (2021); https://doi.org/10.3390/ma14216665.
2. M. Henn, M. Buser, V. Onuseit, R. Weber, and T. Graf, “Combining LPBF and ultrafast laser processing to produce parts with deep microstructures,” Lasers in Manufacturing Conference 2021; see https://bit.ly/3LcED9k.
3. See https://youtu.be/xYmiGJcqvEw.
4. D. Holder, M. Buser, A. Leis, R. Weber, and T. Graf, “Post-processing of additively manufactured metal parts by ultrashort laser pulses for high-quality net shape geometries and advanced functionality,” IOP Conf. Ser. 2021; https://doi.org/10.1088/1757-899X/1135/1/012005.
About the Author
Manuel Henn
Scientific Employee, Institut für Strahlwerkzeuge (IFSW) at University of Stuttgart
Manuel Henn, M.Sc., is a scientific employee in the Institut für Strahlwerkzeuge (IFSW) at the University of Stuttgart (Stuttgart, Germany).
Matthias Buser
Scientific Employee, Institut für Strahlwerkzeuge (IFSW), University of Stuttgart
Matthias Buser is a scientific employee in the Institut für Strahlwerkzeuge (IFSW) at the University of Stuttgart (Stuttgart, Germany).
Victor Lubkowitz
Research Associate, Manufacturing and Materials Technology at Karlsruhe Institute of Technology
Victor Lubkowitz, M.Eng., is a research associate in the Manufacturing and Materials Technology department at the Karlsruhe Institute of Technology (KIT; Karlsruhe, Germany).
David Kolb
Scientific Employee, Aalen University – Laser Application Center (LAZ)
David Kolb is a scientific employee at Aalen University – Laser Application Center (LAZ; Aalen, Germany).
Markus Hofele
Head of Laser Macro Application group, Aalen University Laser Application Center
Markus Hofele is head of the laser macro application group at Aalen University – Laser Application Center (LAZ; Aalen, Germany).


