Laser welding using OCT imaging
MARKUS KOGEL-HOLLACHER
Sensor technology in particular is a leading component of a Smart Factory and predictive maintenance, and even process control. Transforming machine elements into intelligent cyber physical systems involves the integration of smart sensors for condition and process monitoring. Developing sensor systems especially for this industrial area is one of the main business units at Precitec, and the use of optical coherence tomography (OCT) imaging in laser materials processing has become a substantive element of today’s process monitoring and control activities.
How OCT works
OCT technology is an imaging technique based on low-coherence interferometry (LCI), and it is a long-established medical examination procedure. An interferometer with a light source of low coherence length is used to measure distances and the composition of human tissue—for example, the cornea. The low coherence length is achieved through the use of light sources that emit broad spectrum light. The applied light sources are typically superluminescent diodes (SLDs) with a range of some tens of nanometers.
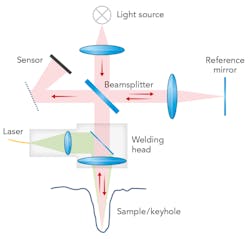
In contrast to sensor technologies, which are typically used in laser materials processing and which determine the process status by utilizing the emissions emerging from beam-material interaction, OCT uses a dedicated light source coupled into the beam path of the processing laser. This allows the measuring position to be set individually, coaxially, or with a slight offset to the processing beam or by using a deflection unit independently. The extremely high measuring frequency enables the use of this technology, even with high-speed laser processes. OCT technology is also called low coherence interferometry, which describes the basic layout of the method, consisting of a reference and measuring path. The difference between both paths can be precisely measured and as the reference path is fixed, the value derived from the system exactly matches the path difference, which is, for example, depth of a keyhole or surface topology in laser powder-bed fusion (LPBF) or in surface ablation processes (FIGURE 1).
Innovations and benefits
Besides all the effort in mechanical and optical integration of the sensor components, the real innovation achieved with the adapted technology is as follows: the accuracy of the interferometric measurement is not affected by electromagnetic emissions from the vapor capillary or their adjacent areas, neither in deep penetration welding nor during laser surface modification. Only the specific light emitted from the low coherent light source leads to interference between the reference and the measurement path.
These benefits of the sensor principle led Precitec to focus on this technology more than 10 years ago. Thus, with accurate positioning of the measuring point, a measurement of the depth of the keyhole is possible coaxially to the processing laser, regardless of weld geometry and material, and the topography of a structured surface can be exactly determined independent of the surface condition. The only limitations are the dimension of the measurement point relative to the spot size of the laser processing and the size of the measurement range in the axial direction.
This technology opens new horizons for manufacturing with lasers, particularly with respect to:
- Reduced manufacturing costs for an existing product
- Improved quality in an existing product
- New product design
- Reduced process costs
- Shorter development lead time
- Improved quality assurance
- Detection and correction of defects during early production stages
- Real-time controlled processes
It has been shown that the accurate positioning of the OCT measuring spot is a key element for successful industrial implementation. To secure the correct spot position during production against various outside influences—for example, thermal impact on optical components—Precitec developed a module named KeyholeFinder. All moving elements consist of industrially proven parts that guarantee a static position of the measuring spot. The KeyholeFinder module also is the preferred solution to automatically adjust the OCT sensor during system setup.
With respect to demand for complete monitoring or even control, additive manufacturing processes like laser metal deposition (LMD) and LPBF are not distinguished from other laser applications. Precitec demonstrated in miscellaneous applications that OCT is the most promising sensor technology to acquire the most comprehensive information regarding the topology of the processing result and, due to the coaxial adaptation, this is possible in situ. Possible process error conditions in 3D printing with LPBF—for example, pores, distortion, coating defects, layer offsets, or even the so-called balling effect, will result in topography changes and therefore are picture-perfect to be detected and measured with OCT technology.
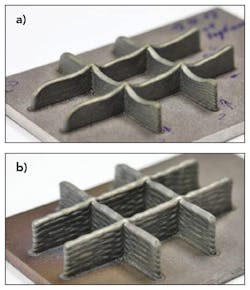
In 2019, Siemens and Precitec demonstrated a fully closed-loop-controlled LMD process by integrating the OCT technology into the SINUMERIK control. What is true for other laser manufacturing processes also holds true for LMD—even the metal powder blown to the workpiece surface does not change the exact surface topology measurement, so the metered value can be used as input for a control loop. This work was carried out in a funded project by the European commission called PARADDISE – A Productive, Affordable and Reliable solution for large scale manufacturing of metallic components by combining laser-based Additive and Subtractive processes with high efficiency (FIGURE 3).Looking back at the last five years from the first industrial version of an OCT sensor for use in laser materials processing applications (presented by Precitec), this sensor has taken scientific and industrial users by storm. It is unusual to find any laser conference without dedicated OCT sessions. There is a generation of young scientists growing up who cannot believe that there was a pre-OCT time. In many universities and research institutes, this sensor is used as a standard to set up laser processes or to evaluate the processing result, from continuous-wave to short- and ultrashort-pulsed processing. ✺
MARKUS KOGEL-HOLLACHER ([email protected]) is Head of R&D Projects at Precitec, Baden-Baden, Germany; www.precitec.de.


