Marking transfer gears
Automotive OEM turns to laser marking for positional accuracy, cycle time, and mark verification advantages
by Jim Rose
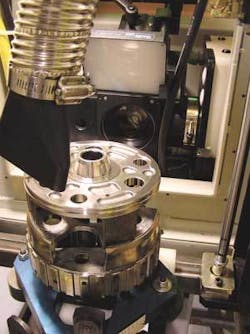
In 2004 Process Equipment Company (PECo) was awarded a project with an automotive OEM to provide in-line automation and equipment to process transfer gears for a new six-speed rear-wheel-drive transmission. The project included an eddy current check to confirm that incoming transfer gears were heat treated within assigned limits and an automated system to laser mark each gear with both a machine-readable 2D matrix and a human-readable unique serial number that confirms the gears have passed the hardness check. A verification station reads the 2D laser mark to ensure that it is correct and readable, rewrites the inspection and process information to an RFID tag on the gear transfer pallet, and sends this information to an archive location.
The automation system was to include a powered conveyor with multiple singulation devices and move dedicated pallets through the eddy current stations, the laser marking station, the verification station, and the RFID read/write station. In addition, the automation system was to have a loop conveyor that would allow rejected transfer gears from either the eddy current check, the laser marking station, the camera verification station, or the RFID read/write station to be sequestered via a reject procedure so the suspect parts and pallets did not progress through the assembly line process. The reject items require a decision and dispensation by the operator before they can be rejected out of the line or released back into the machining process.
Eddy current process
Multi-frequency eddy current testing has gained acceptance where 100 percent inspection of heat-treated parts is required. This process replaces spot checks and control methods that can be unpredictable, allowing defects to go undetected. The eddy current check is a computer-based nondestructive testing (NDT) process where the heat-treated production part passes through an eddy current coil for inspection. This test uses test frequencies to check hardness, case depth, and heat-treat patterns. Different frequencies can also be used to determine mixed materials, grinding problems like heat checking, and to review parts for a required microstructure. ANDEC Manufacturing Ltd. (Toronto, Ont), a North American distributor for Rohmann GmbH, supplied the eddy current instruments, test and comparator coils.
Processed transfer gears were lifted into the test coils while still resting on their automation system fixture pallets, and the results of the eddy current test were immediately compared to a known, acceptable transfer gear located in a comparator coil. The test took three seconds to perform and the results of the test were stored for reference. The heat treat check was 100 percent successful in checking that the transfer gears were heat treated properly and to a required case depth.
Laser marking process
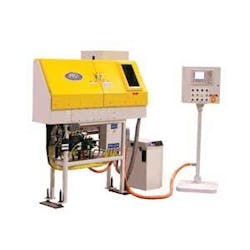
Laser marking of the transfer gears is accomplished using a custom PECoMark System that satisfies the project requirements for positional accuracy of the laser mark, the cycle time of part management, and marking with the incorporation of the mark verification step to be discussed later.
The system accepts the fact that the transfer gears were checked for heat treat correctness, transfers the part variants on the powered conveyor still on their pallets to the laser marking enclosure, and laser marks the gears with a unique identification number depending on type and variant. The laser marking specification is for a 2D readable matrix and a ten-character human-readable line of information or mark.
A TRUMPF VectorMark VMc3 is used because of its ability to provide a quality mark on “as” heat-treated surfaces and marking speed. The cycle time for laser marking both the 2D-readable and human-readable mark is less than 8 seconds on heat treated material with a deep etch. These laser marks will provide the customer with tracking and traceability for the transmission parts for subsequent machining operations, assembly operations, and warranty issues for the life of the components.
Verification process
The verification step after the eddy current and laser marking process is critical to system performance. If the tracking and traceability of the transfer gears are to be successfully accomplished the 2D-readable mark has to be verified prior to releasing the part into the subsequent manufacturing processes. The historical information about the part is embedded in the 2D-readable laser mark and written onto the RFID tag on the pallet.
PECo separated the verification process from the laser marking step putting this operation in a different station on the automation line. This robust verification station is able to read the laser marks.
A Cognex Insight 5100 camera, lenses, and software are employed in this operation. The transfer gears are left on the pallet during the verification step, and the pallet and part are lifted up from the powered conveyor to improve the quality of the 2D-readable read. The process is 100 percent effective when the laser mark from the TRUMPF resonator is tuned-in and maintained.
The significant advantage of this system is that it is a full turnkey solution provided by PECo, which produced four complete systems with the integration of identical major components to provide the automotive OEM with manufacturing redundancy. Each system allows the manufacturer to incorporate a 100 percent validation check with tracking and traceability in-line matching or exceeding the production line cycle time requirement. PECo uses the same eddy current instrument in each system, the same laser for marking, the same camera system, and the same powered conveyor and metering devices. The differences between the transfer gear parts are the pallets, inspection coils, comparator coils, part sensors, and the specific programs.
The four systems are engineered to identify different transfer gear types and variants reacting to in-line changes with operator-friendly selection keys, poka-yoke sensors indicating which part is being presented, and automatic program changes.
Jim Rose ([email protected]) is sales manager of Process Equipment Company, Design Engineering & Assembly (DEA) Group, Tipp City, OH, www.processeq.com.


