Process monitoring in laser additive manufacturing
Sensing and data analysis approaches work to meet demand
COREY DUNSKY
Within the past 18 months, additive manufacturing (AM) of metal parts has drawn an enormous surge of industrial interest. According to industry expert Terry Wohlers (Wohlers Associates, Inc.; Ft. Collins, CO), while the AM industry as a whole grew by 34.9 percent in 2013, the metal AM segment experienced growth of over 75 percent. Indeed, Wohlers commented recently that metal AM "has come farther in 10 years than plastic [AM] did in 25 years" [1]. Industries driving metal AM processes forward include the automotive sector, medical technology, and particularly aerospace. GE Aviation's planned AM production of their LEAP engine's fuel nozzles (see "Additive manufacturing at GE Aviation" in the November/December 2013 issue of ILS) as well as EADS's evaluation of AM structural components for Airbus aircraft indicate that powder-bed metal AM is a technology on the threshold of industrial acceptance.
Despite this, questions remain about process reliability and the repeatability of finished parts' material properties. As noted in a recent interview with Dr. Florian Bechmann, head of development at OEM equipment maker Concept Laser GmbH (Lichtenfels, Germany), increasingly in metal AM machines, "customers expect active process monitoring and series production capability, i.e., reproducibility at an industrial level" [2]. In situ, real-time monitoring of the selective laser melting (SLM) AM process promises to address these concerns, but the monitoring technology is still in its early days. Here, we review the state of the art of this highly active area of AM research and equipment development.
Technology basics
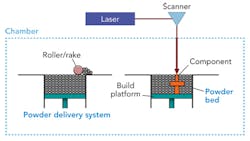
Laser additive manufacturing (LAM) machines are of two types: powder bed and powder-fed. The intense recent interest has focused on the latter, and this discussion is confined to it. FIGURE 1 shows a schematic of a generic powder bed system where the bed is created by raking powder across the work area, which rests on the build platform in an environmentally controlled chamber. Laser energy is delivered to the surface of the bed, locally melting and fusing the powder in areas where solid metal is desired.
Typically, each pass of the laser melts down through and re-solidifies several layers, which are commonly 20–150µm thick. After each laser exposure, additional powder is raked across the work area and the process is repeated to create a solid, three-dimensional (3D) component. A single "build" can contain thousands of layers, so each run can take tens to hundreds of hours. Dozens of identical or different parts may be created in each build.
Due to the repeated layer-upon-layer melting and rapid solidification of the metal AM process, parts experience a complex thermal history involving directional heat transfer. Some of the major alloys for aerospace and medical/dental applications may also experience repeated solid-state phase transformations. These factors complicate the analysis of the finished part's microstructural properties, relative to those of parts made by conventional means. The directional heat extraction frequently results in grain structures that are columnar in the z-direction (perpendicular to the build plane) and, as a recent review of metal AM noted, "Microstructural and mechanical property anisotropy is ubiquitous in AM with the z-direction generally being the weakest." [3] Typical defects in the SLM process include micro-porosity and lack of fusion between neighboring layers. Of particular concern for aerospace applications are fatigue cracks initiating at pores close to the part surface, while surface roughness has also been shown to affect fatigue life [4].
Taken together, particularly for structurally critical components, these issues mean that qualification and certification are significant challenges to widespread adoption of AM. Recently, AM technology reviews have repeatedly called for real-time, closed-loop process controls and sensors to ensure quality, consistency, and reproducibility across AM machines [5]. The overall goal is robust layer-by-layer quality assessment with spatial resolution below 1 mm2 that will eliminate today's post-build inspection or destructive testing. Leading aerospace manufacturers are enthusiastically supportive: Greg Morris, GE Aviation's business development leader for AM, says, "Today, post-build inspection procedures account for as much as 25 percent of the time required to produce an additively manufactured engine component. By conducting those inspection procedures while the component is being built, [we] will expedite production rates for GE's additive-manufactured engine components like the LEAP fuel nozzle" [6].
Machine and process variability
The fundamental issue addressed by process monitoring is variability in the state of the AM machine or the laser-material interaction, which in turn can perturb the metal's microstructure or macroscopic mechanical properties. Environmental factors such as build plate and chamber ambient temperature, chamber oxygen concentration, and flow rate of inert gas across the powder surface play a role in process shifts and the formation of defects. Laser power, focused spot size, and power-density variation in the z-direction are critical parameters governing potential fluctuations in the material's thermal excursions on each laser pass. Particle size distribution and morphology affect how the powder packs within each layer, influencing finished surface quality and density of LAM-produced components [7]. Key motion parameters include scan speed and hatch (x-y) spacing, though modern galvanometer-based scanners do a good job of holding these sufficiently steady and reproducible. The layer creation or "re-coating" process must also be highly consistent, both in terms of in-layer thickness uniformity and layer-to-layer repeatability. And finally, part geometry can play a role in the heat transfer process. Conductive heat transfer to underlying material can differ at overhangs and sharp corners, giving rise to stress deformations as well as porosity, pinholes, or microcracks. Jim Fendrick, VP of North America operations at SLM Solutions NA, Inc., notes, "What controls the process is the local thermal condition, and geometry does matter."
Approaches to quality assurance
Given the large number of parameters influencing the material's cumulative thermal exposure, strategies for implementing in situ quality assurance (QA) on AM machines fall into three categories:
1. Sensors for monitoring and controlling various aspects of the machine state;
2. Techniques for assessing defects or irregularities in the powder-bed surface or layer thickness; and
3. Direct sensing of the small laser-material interaction zone, or "melt pool."
Leading OEM AM system vendors such as SLM Solutions GmbH (Lübeck, Germany), Concept Laser, and EOS GmbH (Krailling, Germany) are approaching these challenges with a modular hardware and software approach. EOS gives the generic name 'EOSTATE' to its modules, while Concept Laser refers to theirs as QM (quality management) modules. SLM Solutions' latest systems feature up to six modules, each named according to its function.
Sensing the machine state
This was the first aspect of "process monitoring" to be implemented on commercial AM tools. Control of the in-chamber conditions is the initial step. Temperature and residual oxygen content of the inert atmosphere, temperature of the build plate and pressure drop across the system's gas-scrubbing filter are monitored, regulated, and logged. Concept Laser's QMatmosphere module regulates the chamber O2 concentration, while EOS's EOSTATE Base monitors several chamber and other machine conditions. SLM Solutions' Sensors module monitors temperature at several locations throughout the machine as well as filter conditions and O2 concentration in the chamber, logging these data every two seconds.
The next level of machine-state sensing involves the laser and optics. As of the time of writing, laser/optics monitoring typically ranges from simple logging of nominal states of laser subsystems and scanner self-calibrations (EOS's EOSTATE Base), to measurement and control of laser power (EOS's EOSTATE LaserMeasurement; Concept Laser's QMlaser; and SLM Solutions' Laser Power module).
Because laser power density governs both the size of the melt pool and temperatures reached as the beam passes over the powder, controlling the location of the beam waist or caustic relative to the powder surface is also important. SLM Solutions accomplishes this with their Caustic Control module. Light emission is collected on-axis and is split off to a sensor. The sensor continuously detects focal spot diameter, focal plane position, and beam irradiance profile. Drift or sudden changes in focus conditions trigger alerts or halt the build process.
AM tool vendors have also moved to monitor and control the uniformity of the powder bed. This typically involves acquiring visible-light images of the entire bed, in which non-uniformities show up as contrasting features. EOS's latest machines incorporate this function in their EOSTATE PowderBed module, which logs two images per layer for offline review. Similarly, SLM Solutions' Layer Control System module grabs an image of the layer surface after each powder re-coat and again after each laser exposure. The images are automatically analyzed and anomalies detected and flagged as the build proceeds. When builds consist of many identical components, localized analysis of sub-portions of the image can reveal process errors on individual parts. This creates the possibility of ceasing further build-up of defective parts while continuing with the rest, saving time and materials.
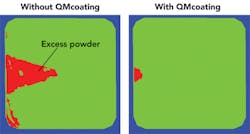
Concept Laser's QMcoating module takes more active control of the layer re-coating process. It monitors the layer surface while powder is being applied and detects and compensates for variations in layer thickness from layer to layer or across the build area (FIGURE 2).
Monitoring the melt pool
Since the microstructural properties of AM parts are governed by the material's thermal history, the ultimate objective in AM process monitoring is to capture the temperature reached at all 3D locations within a part. Such a so-called "heat map," however, involves a tremendous quantity of data. Today, sensors, signal-processing algorithms, and data-storage strategies are under active development that can begin to address the challenges of point-by-point collection and archiving of thermal information. OEM equipment vendors, innovation-oriented small companies, and government research labs have current development programs.
The task is to gather information that either directly or indirectly indicates the temperature in a small region surrounding the laser focus, known as the "melt pool." Ideally, direct, spatially resolved temperature measurements throughout individual areas of about 1 mm2 would be obtained. In addition, taking a page from the laser welding world, substantial efforts are also underway to measure melt pool size and shape. The task is significantly more difficult than it is for laser welding or powder-fed AM processes, though, since the high beam scanning speeds (~ 1m/s) and required fine spatial resolution mean high-bandwidth signal acquisition and processing are needed, as well as massive data storage.
Two approaches to melt-pool sensing are currently being pursued: imaging and collection of emitted light. For imaging, both infrared (IR) and visible-wavelength cameras are being explored, though the high required framing rates (several-thousand frames per second) are beyond the reach of all but the highest-end IR devices. For emission detection, variations of optical pyrometry or spectroscopy are employed. The most common arrangement consists of a photodiode with or without an upstream IR bandpass filter. Two such filtered detectors can be used to implement the two-color pyrometry technique.
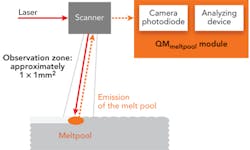
In many cases, equipment vendors are developing hybrid sensors that utilize both imaging and emission sensing. FIGURE 3 shows a sketch of Concept Laser's implementation of such a scheme in their QMmeltpool module. The coaxial visible-wavelength camera, with ~ 1 × 1mm field of view and high spatial resolution, acquires images at framing rates as high as 4000 frames/s. The photodiode signal can provide even higher-frequency information, if desired. To cope with the deluge of data, information is consolidated and stored for each entire layer, rather than all individual locations within the layer. According to Bechmann, the camera takes a "very detailed picture" and can detect low-energy melt pool conditions due to lens contamination or laser aging, as well as deviations in the powder dosing factor [2]. FIGURE 4 shows the difference that reduced laser power makes in a part containing small "window" features.
SLM Solutions' Melt Pool Control module, currently in development, relies on fast single-point IR emission measurements at two wavelengths. After analysis, data are presented as 2D maps of thermal energy. Data acquisition and analysis is accomplished at each point in ~ 70µs for a high, effective sampling rate of ~ 14kHz. More significantly, the system will soon be able to dynamically adjust laser output power at this rate, achieving true closed-loop power control based on melt pool information. FIGURE 5 shows a fine lattice test structure where the effect of melt pool control is evident.
For melt pool monitoring, EOS has taken a somewhat different approach. Rather than pursuing in-house development, the company has partnered with plasmo Industrietechnik GmbH (Vienna, Austria), whose fastprocessobserver system has been field-proven in laser welding environments. The system utilizes one or more off-axis photodiodes to collect broadband light emission from the laser-induced plasma. The signals are analyzed in the time and frequency domains, employing a number of proprietary signal-processing algorithms. Anomalies detected by the analysis can be correlated with different types of defects once the system is "trained" with reference known-defective and defect-free process conditions. Challenges for adoption in powder-bed AM environments include the much higher required sampling and signal-processing rates [8]. As of press time, plasmo's monitoring system has been integrated with EOS's machines and is undergoing evaluation at a major end user.
Summary and outlook
In late 2011, Prabhjot Singh, manager of GE's Additive Manufacturing Lab, observed: "[An AM] part is made out of thousands of layers, and each layer is a potential failure mode. We still don't understand why a part comes out slightly differently on one machine than it does on another, or even on the same machine on a different day." [9]
In large part, that assessment is still accurate today. In the meantime, early adopters like GE Aviation have spent years learning the nuances of their AM tools, characterizing the process windows and sensitivities, creating process databases, and qualifying each machine. The early adopters will likely begin their production ramps in the next 12–18 months without process monitoring or closed-loop laser power control on their production equipment, relying instead on their deep knowledge base to keep the machines producing good parts.
The sensors and sensed quantities being pursued today for AM process monitoring are mostly derived from experience with established processes such as laser welding. As such, they may or may not turn out to be the best means of identifying AM process anomalies in situ. It is still the early days for metal AM, and the equipment and powder materials are evolving rapidly. So, too, will sensing and data analysis technologies. Parallel efforts are currently underway to carry out physics-based simulations of the laser-powder bed interactions, and to establish detailed databases tying material properties to process parameters and powder characteristics. In the next several years, these may help illuminate the optimal quantities to monitor, point by point, in or near the melt pool, as well as the best sensors to use. Meanwhile, rapid innovation will continue, though the advent of truly robust process monitoring and control is probably still a few years away. As major manufacturers plan for volume production of metal AM parts, we should expect to see more emphasis being placed in this area and much continued development activity. The AM process monitoring race is on, and the winning technologies and competitors have yet to be identified, much less declared.
REFERENCES
[1] T. Wohlers, "Additive Manufacturing State of the Industry," RAPID 2014 keynote presentation, Detroit, MI (June 12, 2014).
[2] See http://bit.ly/1pMSxB2.
[3] W. Frazier, J. Mater. Eng. Perform., 23, 6, 1917–1928 (June 2014).
[4] K. S. Chan, M. Koike, R. L. Mason, and T. Okabe, Metall. Trans. A., 44, 1010–1022 (Feb. 2013).
[5] J. Scott et al., Additive Manufacturing: Status and Opportunities, IDA, Science and Technology Policy Institute, Washington, DC (2012).
[6] See http://bit.ly/1vElDrW.
[7] G. Overton, "How does additive manufacturing 'stack up' against subtractive methods?" Laser Focus World, 50, 2, 23–27 (Feb. 2014).
[8] T. Grünberger and R. Domröse, Laser Tech. J., 11, 2, 40–42 (Apr. 2014).
[9] D. H. Freedman, "Layer by Layer," MIT Technology Review; see http://bit.ly/1sSVGS3 (Dec. 19, 2011).
DR. COREY DUNSKY([email protected]) is the president and founder of Aeos Consulting, Inc., Los Gatos, CA.


