Laser profiling and monitoring
Why process monitoring of CO2 lasers is necessary
Cutting, welding, and marking of steel, steel alloys, and other materials have historically been done by contact techniques. Recent advances in high-power (greater than 1 kW average power) CO2 laser design have made these lasers more economical to purchase and operate. As a result, the high-power CO2 laser has gained acceptance in many industrial processes formerly reserved for those other technologies. Laser welding and cutting offers the advantage of noncontact processing, making it possible, for example, to process over large areas using remote-welding heads. Laser processing creates a much smaller heat-affected zone (HAZ), which reduces processed material dimensional issues, lending itself to precision parts manufacturing. As long as the laser beam is stable and focused at the workpiece, laser processing can offer significant cost advantages over nonlaser processing.
Laser processing is primarily a thermal event, [1] whereby the energy from the laser is focused to a small target area, which then imparts heat to the material being processed. It comes as no surprise that many processes are highly dependent on the amount of energy that can be coupled to the process material. In many cases, the efficiency of the process is a function of the irradiance squared or cubed [2] . It follows that the total amount of energy as well as the spatial distribution of the energy at the workpiece is critical to the success of the process and can be substantially affected by distortions in the spatial energy profile of the laser. Because many CO2 lasers operate in more than one mode [3] , the mode quality is important.
In welding applications, gap alignment of parts must be properly maintained. This requires that the laser energy be directed consistently at the same target area without focused spot wandering. When welding at high speeds, undesired structure in the beam can cause problems in the weld. In laser cutting applications, the quality of the beam and its ability to be focused are critical to the quality of the cut itself. A poor-quality beam can result in higher costs in scrap or rework of the cut parts. In spite of all these limitations, laser material processing offers enough advantages to allow it to become a dominant force in the future of materials processing.
Why profile the laser?
Spatial beam profiling is the one measurement that combines all the variables that create a laser beam into one intuitively easy-to-understand visual image. This holds true for all laser beams, not just CO2 lasers [4]. The most commonly used method for a CO2 laser is an acrylic mode burn, whereby the unfocused laser beam is directed to an acrylic block, and the energy delivered to the block vaporizes the material in proportion to the spatial energy profile of the beam itself. The resulting profile represents the spatial energy distribution of the laser beam during the time the acrylic is exposed to the beam, usually many seconds.
Although this method has been widely used, its accuracy and repeatability depend heavily on the expertise of the technician performing the mode burn. It also creates quantities of flammable, toxic vapors that must be extracted from the workplace. This method also does not allow the user to measure the transient response of the laser during the exposure, masking any changes at the very start of the process, for example. Mode burns are, at best, a good approximation of laser performance.
Over the past 10 years, a number of semi-electronic diagnostic methods have been developed, with varying success. Most of these have attempted to image the spatial energy profile of the unfocused main beam by sampling a small representative portion of it and directing the sampled beam to a sensor of some sort. For high-power applications, these samplers use either a micron-size pinhole in a small hollow tube, or a small mirror at the end of a thin wire to direct a small portion of the raw beam toward a pyroelectric single-element sensor, which then converts the amount of energy into a proportional electric signal. To sample the entire beam, however, the pinhole or mirror must make repeated passes through the beam, and then the entire beam can be reconstructed as a composite image. The image produced is a composite, progressive time-scan of the beam, which can range from 2 to 10 seconds in duration, depending on the instrument used. This method eliminates the toxic gases, but does not provide any more information about the transient response of the laser than an acrylic mode burn. One of the possible drawbacks of this method is that the sampling device passes through the beam, so there is no way to determine conclusively if the measurement itself affects the quality of the beam.
For an electronic beam profiling system to offer an advantage over traditional methods, it has to be able to resolve the beam in real time so that the end user can tune and adjust the laser without waiting for a response from the measuring instrument. It has to be robust enough to withstand the rigors of everyday use in a plant environment where dust and gas fumes from the process are present. The system has to be able to be either set in place quickly or permanently mounted in the optical path. It must be easy enough to use by relatively unskilled technicians, yet provide detailed, quantitative information not available by traditional means. Lastly, the system must not interfere with the main beam in any way or else artifacts will be introduced into the process.
There are applications for which even periodic evaluation of the laser beam mode quality is not sufficient. These can include medical devices, where verification of the mode quality is critical to the successful production of a part, or other operations where a history of failed parts has resulted in lost time and reduced production. In these cases, the downtime and lost production can often amount to many thousands of dollars for each event.
To address the increasing need for an online, high-power CO2 laser beam monitor, Spiricon (www.spiricon.com) and II-VI (www.ii-vi.com) jointly developed a robust, easy-to-maintain industrial laser beam monitoring system. This device uses off-the-shelf optical components and can be installed in a new laser workstation by the laser system integrator or retrofitted to most existing industrial laser systems. It provides the end user with detailed, real-time beam images, and logs critical laser beam parameters. When any of these parameters reaches a preset limit, an alarm can be triggered to alert the operator of impending failure, and the operator can then take appropriate action. In addition, the system can be used to diagnose common laser problems, such as a deteriorating output coupler or a misaligned laser cavity. Using the diagnostic feature of the system allows the technician to return the laser to service in less time, increasing the profitability of the process.
The inline system, unlike other devices currently available, is completely transparent to the process, as there are no active devices that interrupt the beam. All the optical components are passive reflectors, and are liquid-cooled. The enclosure itself is purged with the same purge gas used in the main optical path, and once the system is installed, it only needs to be maintained in the same way the other optics are treated.
Because the instrument operates in real time, it is well suited for tuning and adjusting the laser after standard maintenance has been performed, or to diagnose actual process events. Because each process is unique, it is impossible to provide examples of all processes, so one of the more difficult challenges is discussed here.
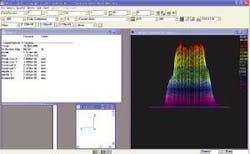
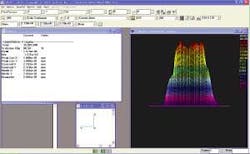
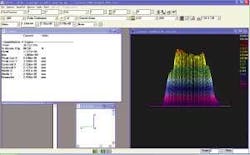
One new enabling technology is remote laser welding. Unlike seam welding, this application requires that the laser energy be directed to a number of locations and the shutter be opened and closed to perform the welds. Two critical measurements for these welds are the spatial energy profile during the weld, and the total delivered energy. The new process monitoring system is ideal for this application. When the data for short-duration welds was examined, both the beam width and the beam profile changed appreciably during the short duration of the weld (Figure 1).
Much has been made of the theory that the spatial energy profile in the unfocused beam is replicated in the focused spot. Although this discussion has been ongoing for many years, there have been few examples to bolster either side of the argument. In the process of validating the online system, simultaneous measurements of the unfocused laser beam and the focused spot were made with two different instruments. When the results were compared, it was clear that the spatial energy distribution for this particular laser was almost identical in both the unfocused and focused beam. It was also established that the system did not affect the structure of the focused spot by measuring the profile at focus both with the instrument installed and comparing it to the profile with the instrument removed from the optical beam path. Figure 2 shows the images taken by both systems.
One side of this discussion has maintained that studying the spatial profile of the unfocused beam has no relevance to the spatial energy distribution at the focused spot, while the other side has argued that undesirable structure in the unfocused beam will also appear when focused. In this example, there is a “hot spot” on one side of the unfocused beam. The overall mode structure is a “doughnut” or TEM 01* mode. This is an energy pattern that looks like a typical doughnut.The focused spot measurement also shows the same general mode structure. The “hot spot” is also present at the focused spot. In this instance, the spatial energy profile of the raw beam is predictive of the energy profile at the focused spot.
If the use of high-power CO2 lasers is to succeed in many industrial applications, beam profiling will play an ever-increasing role in demonstrating that the mode quality of the laser is appropriate for processing. As the laser ages, continuous monitoring can alert the operator to impending failures so that proactive maintenance and repairs can be made. When returning the laser to service after maintenance, the same systems can be used to optimize the mode quality quickly and effectively. With a continuous monitor in the system, the critical beam parameters can then be tracked while processing.
There is an economic benefit to these methods, in savings from increased productivity, less scrap, and less downtime. Although each case is different, cost analysis will show that profiling and monitoring will pay for itself in a short time. As processes become even more demanding, laser profiling and monitoring will become increasingly cost-effective.
Larry Green ([email protected]) is the industrial sales manager for Spiricon Inc. (Logan, UT).
REFERENCES
1. Engel, S., “Industrial Laser Processing: Validation with the Use of Beam Diagnostic Instruments,” SPIE Workshop, January 2003.
2. Roundy, C., “Current Technology of Laser Beam Profile Measurements,” ICALEO Short Course, September 2000.
3. Sasnett, M., “Beam Geometry Data Helps Maintain and Improve Laser Processes, Parts 1&2,” Industrial Laser Review, August 1993 and May 1994.
4. Roundy, C., “So, Who Needs Beam Diagnostics?” Lasers & Optronics, April 1994.
5. Roundy, C., “Pyroelectric Arrays Make Beam Imaging Easy,” Lasers & Applications, January 1982.
6. Green, L., “New Method for Beam Profiling High-Power CO2 Lasers with an IR Camera-Based System,” ICALEO, October 2002.


