Northamptonshire, UK—Many laser applications within the medical device industry are ‘micro’ in nature; on components down to submillimeter in size. These applications include cutting, welding, marking, drilling, and surface treatments but across a wide range of materials and devices, both metallic and plastic, and from implants to instrumentation.
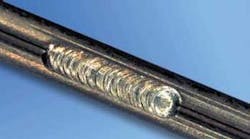
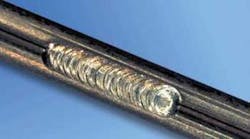
Laser welding is a fast growing application area within the medical device sector, and as such poses a new set of challenges for suppliers as they strive to adhere to the rigorous process and quality standards demanded by the industry. Among these challenges is weld inspection—determining weld volume or defects. Most of the metallic implantable medical devices used within the industry are welded with lamp-pumped Nd:YAG lasers, using a combination of single-shot spot welding and seam welding. The pulsed laser operation enables rapid local heating and cooling, avoiding collateral thermal damage. The devices produced using this process are often wires, tubes, or assemblies combining both, with outside diameters as little as 200–300 µm (see FIGURE 1) and made from stainless steels, Nitinol, or combinations of materials.
Destructive testing can only be performed on a few assemblies; therefore laser welded medical device conformity requires extremely tight monitoring and control of the laser output parameters. In the past it has been difficult to qualify lamp-pumped laser welding in the manufacture of medical devices because of fluctuations in the lamp output, and thereby the laser output. These variations include shot-to-shot fluctuations in laser output power, which increase as the lamp ages, and the variations in output from lamp to lamp, which are significant, even when lamps are new. Historically the problem was addressed by frequent user intervention, which the medical device industry prefers not to have to deal with because of the validation regulations. To overcome these obstacles, some form of control of the laser output is required.
In an open loop control system, combining pulse shaping with a lamp output that is fluctuating over complicates welded product validation, because as the lamp dynamics change with age the pulse shaping can drift. Experience shows that users will fairly quickly decide either not to use complicated pulse shapes or to replace lamps early. This approach may work for welding of stainless-steel based devices, which are less sensitive to pulse shaping, but there are other more exotic materials or combinations where pulse shaping is a necessity.
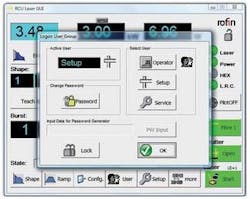
Closed loop control of electrical power and laser output pulse energy however ensures consistent lamp pump output, consistent laser energy output, and eliminates the interference of back reflections from the workpiece. Rofin-Baasel addresses the issue with the Rofin Control Unit (RCU; see FIGURE 2). The RCU provides closed loop control to pulsed Nd:YAG laser welding resonators and it’s use enables a pulse-to-pulse stability of <±1% to be achieved over the full range of laser powers. In addition, what you see is what you get with regard to pulse shaping and ramping. These features provide the stable and predictable welding process required for medical device production.
Not only is it essential to be able to control electrical power and laser output pulse energy, to provide a stable and consistent weld, process traceability also forms a crucial part of medical device validation procedures. The traceability required for laser welded implantable parts is far reaching because of FDA regulations. According to the FDA, process validation is defined as “establishing documented evidence which provides a high degree of assurance that a specific process will consistently produce a product meeting its predetermined specifications and quality characteristics.” With this in mind, laser controllers should be capable of monitoring and recording the key laser parameters for each individual part that is processed.
The RCU meets these criteria by recording and providing the following essential process information: a pulse energy log, an online measurement of pulse-to-pulse stability, a display of the energy values within a pulse train with maximum and minimum levels, and the export of all relevant pulse related data with user-defined filter functions.
For more information, e-mail [email protected] or visit www.rofin.co.uk.
Laser welding thick materialBremen, Germany—Take a 30kW fiber laser and a welding arc and you have the ingredients to weld 28mm-thick steel. The high-strength pipe steel, grade X70, was welded in one pass without the need of an extra joint preparation—a simple square butt joint was enough. Welding such thick materials with conventional processes typically requires a complex joint preparation, such as a V-butt joint, and several welding passes to fill the groove. This means considerable expenses for filler wire and, depending on the welding process applied, a significant amount of production time.
Experiments carried out using 30 kW laser power and a MAG process produced welding speeds up to 2.5 m/min with a maximum wire feed rate of 24 m/min. Gaps up to 0.35 mm were welded in order to demonstrate the good gap bridging ability of this process at such thicknesses; furthermore a gap helps to improve the quality of the root.
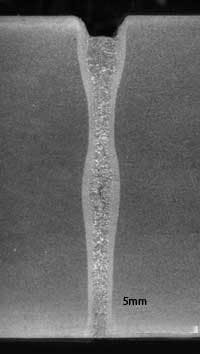
The photo illustrates the typically narrow weld seam achieved with laser welding. The root side is fully penetrated; still the incompletely filled groove could be criticized. This, however, can be attributed to the limited wire feed rate of 24 m/min of the power source, which is not sufficient when welding such thicknesses at high welding speeds of 2.5 m/min. To compensate for the missing material a higher wire feed rate would be needed or alternatively welding an additional cap pass.
X-raying of the weld seam showed some porosity and lack of fusion at the beginning and the end of the weld seam, otherwise it was free of defects. Taking a closer look at the cross section and the bulging in the middle, slight indications of flaws are visible. In this area the focal spot of the laser beam was positioned during the welding process and the highest intensity was reached (at 30 kW of laser power, a focal spot of 420 µm, at least more than 2x10⁷ W/cm²—enough to weld 28 mm thick plates). Such flaws can be eliminated by further improving the parameters responsible for focusing the laser beam onto the workpiece.
The samples welded are not perfect, yet show the considerable potential of laser beam welding and laser-GMA-hybrid welding with high powers for thick section materials. Research and development institutions are working on optimizing these results and welding even higher thicknesses.
We are grateful to IPG Photonics, Burbach, Germany, for supporting the experiments with its 30kW fiber laser. Contact Stefan Grünenwald ([email protected]) at BIAS, Bremen.
Refurbishing turbine engine componentsHouston, Texas—Leading engine manufacturers are more frequently outsourcing turbine engine repair and refurbishing, a business requiring specialized equipment and experience. This business requires a dedication to continually improving the laser processes and quality while providing fast turnaround time. TL Precision Welding Inc.—a 12-person laser contract shop started in 1997 by Quang Tran, a Vietnamese emigrant and Texas A&M graduate—serves this important and growing area of the turbine engine industry.
The company’s early engine refurbishing work has led to new opportunities in laser processing, company growth, and a broadening of its laser capabilities. This is an industry niche with promising growth simply because of the sheer number of turbine engines (both land based and aero engines) in operation and the constant need for engine maintenance. One manufacturer for aircraft reports 25,000 engines in active service, all of which are continuously monitored for periodic maintenance.
The high-value turbo combustors, nozzle guide vanes, blades, and other transition parts for both land and aerospace engines are regularly refurbished and put back into service. To keep maintenance costs as low as possible and to extend time between overhaul, engine manufacturers are requiring suppliers like TL Precision to improve their processes. In 2008 TL Precision purchased its second system from Laserdyne (www.prima-na.com) for drilling difficult-to-machine materials such as Inconel 617, Titanium, and Hastelloy X.
A significant amount of engine overhaul calls for the repair and refurbishing of engine components’ air flow holes that are designed to maximize engine thrust by selectively cooling critical components, and are precision drilled using laser processes in carefully plotted, complex patterns over the part’s contoured surfaces. The holes also are contoured and angled to the part surface to maximize air flow, reduce engine noise, and minimize fuel requirements. The challenge with refurbishing air flow holes in these complex parts is that they must be “re-created” in the same position and with the identical precision size characteristics as the original part when new.
“Recreating precision holes in a used part is often more difficult than generating precision holes in a new part,” reports Tran, the company president. “In recreating the hole, there’s no margin for error because most of these holes are positioned closely together and have diameters as small as 0.020 in and require tolerance accuracies as tight as ±0.002 in. To position and laser process each of these holes accurately—without damaging the part—requires the very best multi-axis laser machining technology and a high level of operator skill.
“Our Laserdyne 790 BeamDirector systems are the keys to doing this work successfully,” reports Tran. “These systems are often the same models used by OEMs to make the parts originally so there are both hardware and software compatibility, which helps facilitate the refurbishing process.”
Another important capability with the laser systems is called “drill-on-the-fly” whereby laser beam pulses are delivered to the part by the stationary laser while the part is rotated. The hole placement is a function of rotational speed and laser pulse frequency. If multiple pulses are required, “drill-on-the-fly” software developed by Laserdyne engineers is utilized to synchronize the movement of the part to the laser pulses, ensuring that multiple pulses are delivered to the exact location required.
For more information about TL Precision Welding Inc., e-mail: [email protected].
