Learning Optics with Austin: Lesson 17 – Quantitative Descriptions of a Lens
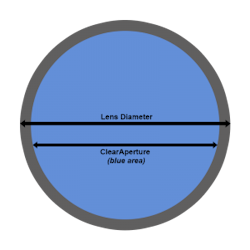
In theory, the entire lens would be up to the qualifications set by the customer. After all, if a customer ordered a 150mm lens, the whole 150mm lens should be up to specification… right? Wrong. This is because in the real world, nothing can be manufactured precisely as specified. While on paper the entire lens works, in reality, the edges of the lens are not to specifications. To account for this error, clear aperture is the area of the lens that is up to specification. Usually, it is written as a percentage of the lens (such as > 95%) or an amount such as 145mm.
Surface quality quantifies the irregularities of the lens surface. We do not want the lens surface to look like the surface of the moon with various spots and streaks and craters. To quantify the smoothness of the lens, scratch measures the size of streaks across a lens. The thicker the cut, the higher the scratch quantity. Similarly, the dig measures the size of spots or bubbles in the lens. The greater the crater or bubble, the higher the dig quantity. Normally, the scratch is greater than the dig.
Surface flatness measures how close the lens surface is to its specifications. The ideal measurement would be 0 which means the manufactured lens is exactly to specifications as the lens on paper. As with clear aperture however, nothing is perfect and thus the product will deviate from the plan. Surface flatness is measured at a certain wavelength in waves (λ) with values closer to 0 being the best and larger values having greater deviations. For example, λ/4 at 400nm would be better than λ/2 at 400nm.
About the Author

Austin from Shanghai Optics Inc
Hello! My name is Austin and I am the host for this blog. I graduated from Rutgers in May 2021 with a Bachelor’s degree in Statistics-Mathematics and History. I interned during the summer of 2021 at Shanghai Optics working on data cleaning and analysis. I was later offered to work full-time starting in September. While my initial role was in data analytics, I realized that my knowledge of the company’s products was quite shallow as a key skill for any well-trained data analyst is to know your data. That’s how I got started on my journey in learning about optics.
I found physics interesting but challenging in high school. I did not particularly enjoy classical physics and a seminar in quantum mechanics flew over my head in college. As I see first-hand how our optics works in different applications, I’m quickly beginning to realize that Photonics has the potential to shape the present and the future. Because of my newfound enthusiasm, management took notice and I am fortunate enough to begin a Physics/Photonics class sponsored by Shanghai Optics in the fall of 2021. This blog is part of my experience in taking the class and sharing with you all the wealth of knowledge I’m acquiring!
Aside from optics, some of my personal interests include studying history and going on hikes. Both activities are great opportunities to talk with other people so feel free to ask me any questions on my personal interests or the materials I post!
