Thermal Imaging: All-sky thermal infrared cloud imager uses low-cost bolometer camera
Measurements of percentage of cloud cover, cloud emissivity, and cloud optical depth are critical to accurate climate and solar radiation studies, as well as astronomical observation and earth-space communications. Although visible, near-infrared (IR), and longwave-IR (LWIR) cloud imagers have been developed that scan the entire sky, these all-sky imagers use expensive reflective optics and IR fisheye lenses.
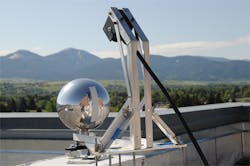
An alternative Infrared Cloud Imager (ICI) developed by Montana State University (Bozeman, MT) and Jet Propulsion Laboratory (JPL; Pasadena, CA) researchers, however, uses a metal sphere that reflects a nearly all-sky (95%) image into an inexpensive off-axis uncooled microbolometer camera and provides full cloud measurements at a fraction of the cost of expensive thermal IR fisheye lenses alone.1
Layout, calibration, and distortion correction
To prevent obstructions within 60° of zenith and allow comparison with zenith-viewing instruments, the low-cost FLIR PathfindIR camera is positioned off-axis from the 10 cm diameter aluminum sphere (see figure). Distortion from the reflected image is removed later during image processing.
The camera was radiometrically calibrated using algorithms developed at Montana State, and sphere reflectivity and emissivity were calibrated by rotating the sphere in front of a large-area blackbody calibration source, with both the sphere and blackbody being set at different temperatures. Sphere emissivity was calibrated using real-time measurements from a small reference target and correlated to sphere temperature. Using geometric ray tracing, zenith angles in the sky were derived for each pixel of the microbolometer camera, and sky radiance values were computed. Finally, distortion from the spherical reflector was removed and typical cloud parameters could be imaged, mapped, and analyzed using standard cloud-imaging algorithms.
Comparison of the low-cost reflective ICI with a more-expensive lens-based cloud imager with 110° field of view in March 2017 revealed a similar sky radiance pattern for both instruments over a four-day period, once a systematic bias was removed from the ICI. This bias continues to be studied, but is not a hindrance to long-term use of the inexpensive ICI instrument.
“This reflective-dome system is the lowest-cost version of infrared cloud imager systems we have been developing and refining for nearly 20 years now,” says Joseph Shaw, professor of Electrical Engineering at Montana State University. “Thermal infrared imaging is ideal for cloud measurements because it provides a consistent cloud signal during both day and night and microbolometer imagers provide an incredibly low-cost solution if you know how to calibrate and stabilize them,” he adds.
REFERENCE
1. B. J. Redman et al., Opt. Express, 26, 9, 11276-11283 (Apr. 30, 2018)
About the Author

Gail Overton
Senior Editor (2004-2020)
Gail has more than 30 years of engineering, marketing, product management, and editorial experience in the photonics and optical communications industry. Before joining the staff at Laser Focus World in 2004, she held many product management and product marketing roles in the fiber-optics industry, most notably at Hughes (El Segundo, CA), GTE Labs (Waltham, MA), Corning (Corning, NY), Photon Kinetics (Beaverton, OR), and Newport Corporation (Irvine, CA). During her marketing career, Gail published articles in WDM Solutions and Sensors magazine and traveled internationally to conduct product and sales training. Gail received her BS degree in physics, with an emphasis in optics, from San Diego State University in San Diego, CA in May 1986.
