Merely five years ago, it would have been questionable to anticipate exponential growth in immersive reality technologies. Today, professionals across numerous industries are discovering that interacting with information-rich 3D displays is far superior to using a 2D screen. While it is still unclear how this revolution in interactive digital communications will evolve, there is no question it is coming.
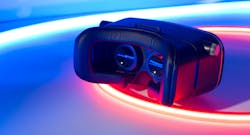
The definition of immersive or extended reality (XR) systems encompasses virtual reality (VR) for a fully artificial visual field (see Fig. 1), augmented reality (AR) for adding digital information to normal vision, and mixed reality (MR) for the complete fusion of the real and digital worlds.
Emerging XR solutions are already making an impact in diverse applications within the entertainment, sports and leisure, enterprise implementations, defense, and healthcare sectors. It is energizing professional training and development programs by allowing virtual access to environments that would be either too expensive or dangerous to access in the real world. It is also transforming industrial manufacturing and design, speeding design to market with rapid prototyping, through to process improvements that enable greater productivity, efficiency, and accuracy.
Technology drivers for immersive reality
XR requires digital optical immersive display (DOID) hardware and expanding the market for these devices will require them to be lightweight, comfortable, and easy to use while also delivering exceptional visual quality, reliability, and processing power.
Miniaturization of the myriad parts and components used in digital optical display devices is fundamental and a key driver behind the growth in the use of immersive reality. The focus is on the use of increasingly smaller micro-optics and integrated optical assemblies, MEMs sensors, and micro-LED displays, among many other integral parts and components. XR systems include not only the projection system for creating the illusion of 3D objects in space, but a host of additional devices, many of them optical, for eye tracking, ranging, and environmental sensing.
A striking aspect of immersive reality devices is the extensive use of innovative optical systems with nontraditional components, potentially with waveguide structures and holographic and metasurfaces to direct light to the eye. Going hand in hand with the growth of immersive reality is an unprecedented demand for micro-aspherical and freeform optics, which provide significant challenges for manufacturers, especially for quality control and design verification. It is here that metrology is stepping up to the mark and supporting and stimulating innovation.
Freeform optics and waveguides
Immersive reality devices require both a wide field of view and a large “eyebox” volume. An eyebox is the ensemble of eye positions for which there is an acceptable view of the image; it is a key parameter in the optical design of XR optics. The larger the eyebox volume, the better and more realistic the user experience. Simulated reality needs to cover the full range of peripheral vision and eye rotations, and this is not feasible for practical wearable devices using conventional geometric optics.
Freeform optical surface shapes, which may have no rotational symmetry or description in terms of conic constants, have evolved from an intriguing optical design concept to a practical necessity for applications ranging from space and defense to consumer electronics. For immersive reality, which combines exceptionally high optical performance with the ergonomic constraints of wearable interactive technologies, designs often call for diffraction-limited performance at large fields of view in off-axis orientations. Freeform optics are often the only way to correct resultant aberrations and present several challenges for measurement technologies. Because freeform optics often have no axial or off-axis symmetry, they are both challenging to design, measure, and manufacture.
A common design for XR optics includes planar waveguide structures, which are important for image transmission and coupling. An optical waveguide is a structure that constrains a light wave to travel along a certain desired path. Planar waveguides are regularly used to replicate the imaging pupil in MR optical systems, which results in a greatly increased eyebox volume. They are often fabricated in the form of a thin transparent film with increased refractive index on a substrate or embedded between two substrate layers. Multiwavelength planar waveguides for DOID systems are complex optical structures, and like freeform optics present numerous metrology challenges.
Meeting the metrology challenge
Metrology tools for immersive reality devices quantify surface form, diffraction angles and efficiency, assembly tolerances, and surface roughness, and assist in development and prototyping, performance evaluation, and production quality control.
Noncontact metrology solutions are often preferred to avoid damage to high-quality surfaces and to provide full-area 3D measurement at high data rates. Full 3D images provide better process insight and characterization of surfaces compared to 2D profiles. These requirements favor optical metrology over contact or tactile solutions wherever possible.
Interferometry uses the wavelength of light and optical coherence to measure distances and surface shapes. Interferometry is often regarded as a high-precision solution for measuring flat and spherical parts, but is difficult to adapt to modern freeform surface shapes and complex surface structures. Designers of metrology instruments have introduced ways to extend the range of high-precision interferometric methods specifically for the measurement of DOID components and systems.
Freeform optics without spherical symmetry provide a great example of how interferometry has evolved to meet the challenge. Precise metrology, not only for surface form but for surface orientation with respect to reference points, plays a key role in providing essential quality control and feedback during the fabrication process. One solution for interferometric measurements of freeforms is computer-generated holograms (CGHs), which when used together with a laser Fizeau interferometer such as the Zygo Verifire, create wavefronts to compensate for the high surface slopes and often asymmetrical shape of aspheric and freeform optics.
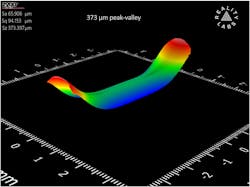
Process control of freeform optics requires 3D topography maps and relational metrology for locating fiducials and mounting points. The Zygo Compass interference microscope accommodates freeform surface shapes by viewing them at a sequence of different perspectives. The final image is formed from overlapping smaller images, which are locked together using specialized software based on the correlation of fine-scale surface texture between neighboring images. Full area measurements show errors missed when using tactile stylus metrology and can detect errors resulting from shrinkage and imperfections in the molding process (see Fig. 2).A challenge for all optical methods is quality control of planar waveguides, which are comprised of two or more semitransparent substrates with holographic coatings to direct light out of the waveguide and into the eye. An interferometric solution for measuring the substrates relies on advanced light sources with swept wavelength capability, which imparts a unique modulation frequency to each of the reflecting surfaces. Instruments such as the Zygo Verifire MST laser Fizeau interferometer evaluate the flatness, total thickness variation, and material homogeneity of waveguide substrates.
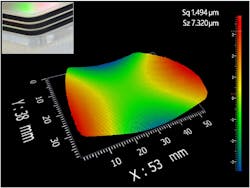
Metrology for complete waveguide stacks requires evaluation of the spacing of glass substrates, their flatness after assembly, and uniformity of gaps between the plates. These dimensional characteristics have a strong impact on the image quality and uniformity in final DOIDs. To measure the completed waveguide assemblies, an effective solution is coherence scanning interferometry, which separates surfaces using interference fringe contrast. An example system is the Zygo Nexview interference microscope, equipped with wide-field objectives (see Fig. 3).Growth in the XR market is stimulating an unprecedented demand not only for traditional optical metrology for surface shapes, textures, and miniature microelectronic devices, but also for micro freeform optics and waveguides. The challenge is on for metrology techniques and technologies to keep pace, especially now as XR technologies and supporting DOID hardware are moving from prototypes to large-scale production.
ACKNOWLEDGMENTS
Many thanks to Chris Young, MicroPR&M, for discussions and contributions to this article.
Compass, Nexview, Verifire, and Verifire MST are trademarks of Zygo Corporation.


