ARNAUD ROYON
Fluorescence microscopes have become ubiquitous in life sciences laboratories, including those focused on pharmaceuticals, diagnosis, and forensics. For the past few years, the need for both performance guarantees and quantifiable results has driven development in this area.1 However, the lack of appropriate standards and reference materials makes it difficult or impossible to compare the results of two fluorescence microscopes, or to measure performance fluctuations of one microscope over time. Therefore, the operation of fluorescence microscopes is not monitored as often as their use warrants—an issue that is recognized by both systems manufacturers and national metrology institutes.2,3
This, of course, calls into question the reliability of collected data. Performance fluctuations of fluorescence imaging systems can impact several measurement types, including detection of investigated elements and measurement of their shape, dimensions, motion, and intensity.According to the broad community of fluorescence microscopists, the ideal calibration tool for fluorescence microscopy would characterize (non-exhaustively) point-spread function; spatial resolution (x, y, and z); spectral irradiance reaching the sample; illumination homogeneity; field flatness; z-distance; spectral resolution; day-to-day and long-term instrument performance; and the detector's range of linearity, dynamic, and limit of detection.3 It should also not undergo photobleaching, and be reliable, durable, and easy to use and handle.
Sub-micrometer structured fluorescence
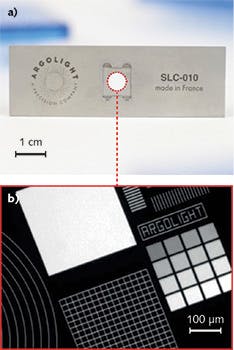
A process developed by Argolight, a start-up from the University of Bordeaux (France), was designed to address these needs. It marks and induces multi-scale (from sub-micron to centimeter), stable fluorescent objects in three dimensions (3D) inside transparent materials, ideally enabling the assessment of widefield, confocal, and multiphoton fluorescence microscopes. Figure 1a shows a typical multi-dimensional (space, intensity, spectrum, lifetime) calibration slide, consisting of a glass substrate on a stainless steel carrier. It features the same dimensions as a standard microscope slide. Various patterns are embedded in the glass, each one intended and designed to respond to a particular misalignment issue or failure of the system (see Fig. 1b).
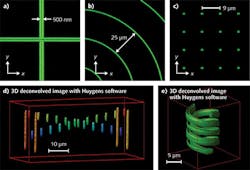
These slides are manufactured from custom photosensitive zinc-phosphate glass. An ultrafast laser, emitting 200 fs pulses at 1030 nm with an average power of 5 W, locally modifies the chemistry of the glass, inducing such fluorescence patterns as 2D and 3D structures, straight and curved lines, dots, "stairs," and even double helixes (see Fig. 2). Fluorescence emitters embedded in the glass matrix are extremely stable, even in harsh environments.The ability to obtain quantitative measurements from collected images enables dramatic improvements. This is true wherever the technology is used, but particularly in the pharmaceutical industry, where it enables, for example, following the effects of a drug over extended periods, and in medicine, where it improves the reliability of fluorescence-based diagnosis.
Measuring microscopes
Researchers at the Friedrich Miescher Institute for Biomedical Research (Basel, Switzerland) monitored the intensity response of a widefield fluorescence microscope for nearly five months using an Argolight calibration slide (see Fig. 5). The research team has measured fluctuations of ±15%, clearly illustrating changes in the intensity response of the device, from either its illumination components (light source, filter) or its detection assembly (camera, filter). For the cell or developmental biologist who wants to perform a study over time, if the intensity of the images is meant to be exploited, it is necessary to normalize them with respect to the intensity response of the system. This example illustrates measurement of just one aspect; additional parameters may also vary.Intensity fluctuations over time in confocal microscopes can be much larger. In fact, the type of instrument is one factor in determining how often microscopes should be measured. Other variables that weigh into this decision include components of the microscope (mercury lamp vs. more stable LEDs in a widefield microscope), experience of the user (an experienced microscopist will notice changes more readily than a novice), whether the system is shared, the type of experiment for which it is used, and the level of quality needed. For example, confocal microscopes tend to fluctuate more than widefield microscopes simply because they have more components (such as piezo stages, galvo mirrors, lasers, and photomultiplier tubes) that are subject to change. And a researcher making a single measurement would not need to measure performance but simply know the system performs well, whereas one who needs to make multiple measurements at different times would have to know the fluctuations to compare measurements. Some pharmaceutical companies require users to calibrate their systems once a day.
With this technology, it takes about 15 minutes to monitor the performances of a microscope, compared with two hours using a combination of other technologies.
For the future
The standard Argo-M slide covers a vast range of microscopes, but does not fill the needs of all microscopists—so custom Argo-U slides can be tailored to meet virtually any requirements. And four new types of standard slides will become available in September 2015: the Argo-HM (High Magnification) for magnifications ≥40x, the Argo-LM (Low Magnification) for magnifications ≤20x, the Argo-SIM for structured illumination microscopes, and the Argo-HCS for high content screening systems.
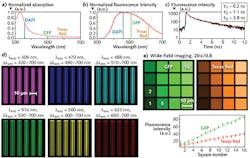
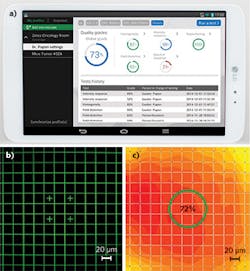
Argolight's non photobleaching fluorescent sub-micrometer patterns are suited to fulfill the requirements of a reference tool for the calibration and alignment of fluorescence microscopes. They provide sub-resolution feature sizes of 250 nm in xy- and <1.5 µm in the z-direction, respectively; spectral features, including broad excitation and emission spectra, short lifetime, and various intensity levels; and long-term stability. In addition to fluorescence, the same patterns exhibit bright- and dark-field contrast, differential interference contrast (DIC), and phase contrast, which make them also suitable to calibrate these types of microscopes. Associated software facilitates not only performance monitoring, but also setup quality management. While the software does not currently fully automate the process, the process could be entirely automated if it was integrated into image-acquisition software—an idea we are proposing to microscope manufacturers.
REFERENCES
1. S. M. Reiss, "Quality and standards: Making bioimaging 'measure up,'" BioOptics World, 3, 1, 14–18 (Jan. 2010).
2. A. Dixon, Springer Ser. Fluoresc., 6, 3–24 (2008).
3. U. Resch-Genger et al., J. Fluoresc., 15, 337–362 (2005).
Arnaud Royon is chief technical officer and co-founder of Argolight SA, Talence, France; www.argolight.com.

![FIGURE 5. Image of the 16-square pattern having different intensity from a widefield microscope [Zeiss Axio Imager Z1, Objective Plan-Apochromat 20×/0.8, Filter set #10 (Exc: 450–490 nm, BS: 495 nm, Em: 500–550 nm), X-Cite 120 illumination, Cameras Axiocam MRm until 12/10/2014, then Axiocam 506 from 12/17/2014] (a). Evolution of the 16th square intensity over time with the same settings applied for each measurement. The jump from 12/10/2014 to 12/17/2014 corresponds to the change of the camera (b). This monitoring is being performed by Ivana Horvathova and Laurent Gelman at the Friedrich Miescher Institute for Biomedical Research. FIGURE 5. Image of the 16-square pattern having different intensity from a widefield microscope [Zeiss Axio Imager Z1, Objective Plan-Apochromat 20×/0.8, Filter set #10 (Exc: 450–490 nm, BS: 495 nm, Em: 500–550 nm), X-Cite 120 illumination, Cameras Axiocam MRm until 12/10/2014, then Axiocam 506 from 12/17/2014] (a). Evolution of the 16th square intensity over time with the same settings applied for each measurement. The jump from 12/10/2014 to 12/17/2014 corresponds to the change of the camera (b). This monitoring is being performed by Ivana Horvathova and Laurent Gelman at the Friedrich Miescher Institute for Biomedical Research.](https://img.laserfocusworld.com/files/base/ebm/lfw/image/2016/01/1506lfwroy_f5.png?auto=format,compress&fit=max&q=45&h=84&height=84&w=250&width=250)