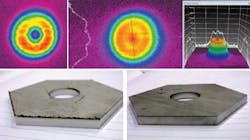
When laser beam profiles for materials-processing applications are not optimized, time and money are lost through lower cut speeds, increased dross on the edges of the cuts (resulting in personnel spending time removing the dross), and more frequent down-time due to increased maintenance. Because conventional laser-measurement methods cannot show how a laser performs over time (lasers fluctuate rapidly from turn-on to several seconds after), real-time thermopile power measurement and beam-profiling techniques can improve laser machining outcomes by providing the laser user with time-based measurements.
Real-time laser power
Legacy laser optimization technologies include simple thermopile measurement devices for measuring laser power and—in the case of carbon-dioxide (CO2) lasers—acrylic blocks for measuring the laser’s beam shape at the workpiece. A mode burn into acrylic usually consists of a shape produced from beam-on time to about a second and a half after the beam has been turned on.
Measuring a laser over several seconds (compared to just the few seconds after the laser is turned on) can reveal trends in a laser’s average power that are missed through a single number given by simple thermopile sensors. By sending data from an Ophir-Spiricon (North Logan, UT; a Newport Corp. brand) 5 or 10 kW water-cooled thermopile sensor to an associated USB device interfaced to a local laptop, power ramps and drifts over indefinite periods of time, for microwatt to kilowatt average power levels, and for deep-ultraviolet to terahertz wavelength ranges (with graphical output in x-y form), which can indicate suboptimal laser operation.
These thermopile sensors convert a difference in temperature created by the laser light source to an electrical signal that is correlated to a laser power in units of watts; the measurement data is sent to either a handheld meter or a local PC running accompanying software. The sensors are calibrated to a National Institute of Standards and Technology (NIST)-traceable source to provide an absolute measurement with ±3% accuracy.
Real-time beam profiling
The Spiricon ModeCheck beam analyzer acquires profile data 15 times per second and can be programmed to provide a color-coded display that shows the beam profile from the beam-on time to several seconds after beam turn-on, easily providing a visual analysis that can, for example, improve cut quality in materials processing applications (see figure). The laser user can view the beam profile over several minutes; in addition, the analyzer can be coupled with a laser power measurement system to take beam profiling and power measurements simultaneously.
In addition to laser output power at the workpiece, and the real-time visual representation of the laser’s mode, there are three beam-profiling measurements available to the laser user.
First, the 13.5% of peak beam diameter algorithm measures the major and minor axes as well as the overall beam diameter to ensure that the beam size is within the laser system manufacturer’s specifications. Second, beam ellipticity is a ratio between the major and minor axes of the beam diameter expressed in either a value between 0 and 1, or a percentage, and is a measurement of the beam’s “roundness” (important for optimizing the cut consistency during multidirectional cutting). Finally, the beam stability measurement is a histogram of the beam position over time.
“During product demonstrations, it has been really fun to watch people’s faces light up when they see their beam like they’ve never seen it before and begin to see the ways in which real-time beam measurement can save them time and money,” says John McCauley, product specialist at Ophir-Spiricon.

