Optical Testing: Quantitative approach improves CGH alignment for asphere testing
Testing the form of a rotationally symmetric aspheric surface to be made in quantity is often done using a computer-generated hologram (CGH), which serves as a null corrector for interferometric testing. This type of CGH is fabricated in glass lithographically or via an electron beam, with a feature pattern derived from the shape of the asphere itself. One advantage of a CGH over traditional null optics is that the fabrication of a CGH is often no more complicated for an asphere of complicated shape than for a simpler asphere, whereas conventional null optics become difficult or impossible to make as the asphere itself grows more complicated.
Properly using a CGH for testing requires the technician to properly align the CGH in the interferometric setup, usually by minimizing the spatial frequency of the test pattern. However, depending on the form of the asphere, the position of minimum spatial fringe density may not be well-defined, which can lead to improper alignment and thus measurement errors on the order of several tens of nanometers.
Stephan Stuerwald of the Fraunhofer Institute for Production Technology and Aachen University (both in Aachen, Germany) has developed a computer simulation that models these errors that can occur due to misalignment of the CGH with the test asphere in an interferometric system and developed an interactive method for better alignment.1 He has experimentally verified the results using a hexapod positioning system and developed a procedure for quantitatively reducing CGH misalignment.
Theory, then experiment
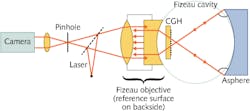
The simulation’s theoretical equations were tested against a direct sequential ray-tracing simulation using software by Zemax (Redmond, WA), both modeling an f/2 parabolic mirror with a radius of curvature of 11 m placed in a Fizeau interferometer within which a CGH null corrector can be placed on one side or the other of the focus of the Fizeau objective (see figure). The modeling equations and sequential ray tracing agreed well to the chosen sixth-order approximation. Thus, a desired CGH phase function can be well represented by basic form parameters of the test asphere.
In a further simplification for calculations of the derivatives (which provide the sensitivity info), the radius of curvature of the aspheric surface is assumed to be much greater than the axial shift d of the CGH. Axial shifts of a CGH usually produce primarily fourth-order spherical aberration; other aberrations were thus ignored in the simulation—an assumption that produces negligible error. The simulation produces the expected minimum and maximum for the negative and positive d (inside and outside of the objective focus).
The sensitivity of the CGH to decenter is modeled in a similar way, with the sensitivity parameter being the azimuthal angle. In this case, the important aberration is a third-order coma.
In the experimental setup, the CGH was mounted on a six-degree-of-freedom positioner, a hexapod made by Physik Instrumente (PI; Karlsruhe, Germany) with a positioning error of less than 100 nm; such a setup straightforwardly allows movement of the CGH in relevant ways, for example around a virtual pivot point. The CGH itself was written in polar coordinates using electron-beam lithography to a form error of less than twentieth-wave.
The experimental setup was designed to accommodate aspheres with diameters up to 100 mm; it includes a CGH holder with five axes of adjustment that can be placed into the bayonet mount of a standard Zygo (Middlefield, CT) Fizeau interferometer. The hexapod was controlled using software by MATLAB (Natick, MA).
Experimental misalignments were measured and were correlated with piston, power, and spherical aberration, as well as with certain nonadjacent Zernike coefficients. The coma value in the Zernike decomposition was always increased with nonideal alignment. All correlations of the experimental measurements of misalignment and measurement error matched well with the theoretical calculations.
A first approach for reducing the form error from a CGH-based interferometric asphere-testing system was developed, performing test series on two different aspheres. In the procedure, five sets of measurements were taken at five different CGH positions relative to the theoretically ideal adjustment. Based on the developed theoretical calculations, displacement vectors are determined that can be used for adjustment; the procedure is iterated to reach good alignment. Other factors can be added in to improve the procedure.
Because the simulations are based on an ideal aspheric form, the technique does not entirely compensate for experimental errors measured on aspheric surfaces with large form errors; the method is limited to moderate real form deviations in the surface on the order of 500 nm, depending on the asphere.
REFERENCE
1. S. Stuerwald, Appl. Opt. 53 (35), 2014; http://dx.doi.org/10.1364/AO.53.008249.
About the Author
John Wallace
Senior Technical Editor (1998-2022)
John Wallace was with Laser Focus World for nearly 25 years, retiring in late June 2022. He obtained a bachelor's degree in mechanical engineering and physics at Rutgers University and a master's in optical engineering at the University of Rochester. Before becoming an editor, John worked as an engineer at RCA, Exxon, Eastman Kodak, and GCA Corporation.

