OPTICAL COHERENCE TOMOGRAPHY: OCT aims for industrial application
When optical coherence tomography (OCT) was introduced in the early 1990s, it was immediately recognized for its ability to produce high-resolution, depth-resolved imagery of biological tissue. Its impact on ophthalmology is evident in a recent article published by Ocular Surgery News. Writes author Richard Lindstrom, “Every day in clinical practice around the world, optical coherence tomography is making a significant contribution to the diagnosis and treatment of vitreous and retinal pathology.” He goes on to predict the availability of OCT in every ophthalmologist’s office.
OCT’s usefulness for nonbiological applications is less well known, though the technology’s noncontact and noninvasive operating method–and its ability to image transparent, turbid, strongly scattering media–make it attractive for nondestructive testing and evaluation (NDT, NDE) of manufactured parts.
In a paper published in 2007, David Stifter, then group leader for nonbiomedical OCT applications in the sensor department of Upper Austrian Research (UAR; Linz, Austria), noted that papers published in the mid-1990s demonstrated OCT’s ability to examine a light-emitting-diode (LED) package and to detect defects in ceramics. He listed numerous industrial applications under investigation, including surface and thickness measurements; NDT, NDE and noncontact material characterization for ceramics, glass and optical components, polymers, fiber composites and paper; and quality evaluation of data storage devices.2
But, Stifter said, while the OCT community was aware of the immense potential beyond the life sciences, the community had been somewhat challenged “to identify key applications and to respond to specific demands and open questions in these fields.” He said those in manufacturing and other nonbiomedical realms saw OCT as “a rather exotic technique, and only a few people outside the field keep track of the large number of novel developments evolving at a breathtakingly fast pace.”
That was two years ago, and while OCT technology has kept up its rapid rate of progression, nonbiological applications have also evolved. The Research Center for Non-Destructive Testing (RECENDT; Linz, Austria), which spun out from UAR’s sensor department, offers dedicated OCT workshops as part of its work to help manufacturers solve their test problems. And commercial OCT developers such as Michelson Diagnostics (MDL; Orpington, U.K.) and Thorlabs (Newton, NJ) have made important announcements concerning the application of OCT to industrial applications.
Advantages for niche applications
Perhaps the greatest benefits OCT offers over the most common test and evaluation methodology currently in use–computed tomography (micro CT)–are price, precision, and speed. The fact that OCT is interferometrics-based makes it inherently precise, and OCT system vendors have been making steady gains in speed. Other advantages include parts accessibility during inspection (CT subjects the sample to ionizing radiation) and the possibility of imaging with hand-held probes–like the ones offered by MDL. Compared with conventional IR microscopy (used sometimes for inspection of silicon parts), OCT offers speed at the expense of resolution and depth. Ultrasound (sometimes used for composite materials) can image deeper and is also available in a handheld probe format, but its resolution doesn’t measure up. Some manufacturers still use the laborious, wasteful, and slow sample-sacrifice approach.
All in all, OCT offers some compelling points–but the technology isn’t useful for every application. “The type of material is key–it must be transparent or translucent to the wavelengths that OCT is available at,” says Jon Holmes, MDL’s CEO, noting that OCT systems offering 1300 nm (near-IR) and some shorter wavelengths are widely available. Holmes says that OCT really shines when applied to inspection of silicon. But other materials are also good candidates, including many polymers and plastics (PMMA, for instance), some ceramics, and organic materials such as wood and pearl. However, OCT is not appropriate for inspecting metals. Holmes also notes that OCT works best at depths of 1 to 3 mm, offers a resolution between 5 and 20 µm, and enables fields of view of just a few millimeters.
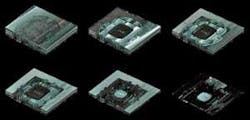
Thus, he says, it is well suited to product development of miniaturized components, and for inspection and test of advanced materials, both on- and off-line. Specifically, it could be valuable for inspection of silicon and plastic microelectromechanical systems (MEMS), quality control of solar panels and devices made of composite materials such as turbine blades, inspection of microengineered plastic prototype parts, polymer devices, and inspection of pearls (see Fig. 1). “OCT will be suitable for many niche applications, which we have only just begun to uncover,” says Holmes.
The recipe for success with OCT is appropriate material choice plus four component specifics. First is the light source’s wavelength, which defines resolution and imaging depth. For instance, 1.3 µm works well in silicon and plastics, due to low absorption at these wavelengths. Second is the light source’s power, which is responsible for contrast in deeper areas. Also key is the spectrometer’s camera and optics, which determine image quality. And finally there is computing power, which enables speed.
Speed can also be enhanced by applying rapidly tunable lasers and faster line-scan cameras, notes Anjul Davis, who is responsible for marketing and business development for the advanced imaging group at Thorlabs. High-speed imaging reduces motion artifacts introduced by either sample motion or the environment. And gains in this area enable high-throughput imaging for manufacturing and process control.
Demonstrated usefulness
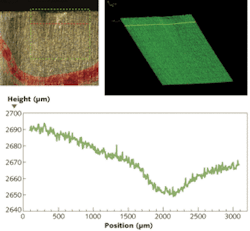
Martin Wurm, a RECENDT research scientist responsible for the development of new systems for industrial applications, says RECENDT’s manufacturing clients are eager to adopt better tools. “It is really great when the manufacturer sees the system,” he says. RECENDT is working to examine products used in the construction industry: polyolefin foam, laminated floor covering, and glass-fiber composites (see Fig. 2).Thorlabs developed the algorithm to quantitatively measure coating layers and surface roughness, which are important for a number of reasons. For one thing, the coating on a time-release tablet dictates how long pill will continue to release drugs into the body. The U.S. Food and Drug Administration (FDA) recommends that pharmaceutical companies monitor each stage of tablet processing online in real time.
Thorlabs designed its Hyperion system, which can image at 110 kHz line rate, to address just this type of application. Davis says the only other technology that could work for this application is terahertz imaging–which is more expensive and not sufficiently fast (see www.laserfocusworld.com/articles/325442).
Overcoming barriers
It takes knowledge both of the technology and the application to successfully apply OCT technology. For instance, any reflective surfaces in the test object can produce confusing image artifacts, due to multiple interferometric path lengths and saturation of detectors. Because the technique is often used to test objects that are too thick or too large, or the application being considered requires greater resolution, the technique can feel less powerful than existing techniques such as micro-CT, according to Holmes
“However, the main barrier to overcome is simply to build awareness of OCT and understanding of the benefits and applications,” says Holmes. “At present, manufacturers are not really aware of the potential of OCT.” Wurm doesn’t think a breakthrough will come until a large manufacturer gets on board and others see how useful the technology is.
Future directions
Wurm has a vision, though, of OCT as part of an inline system with feedback to control the manufacturing process. Stifter notes that industrial application demands instantaneous results. “A difference between acquisition and effective scanning rate (for instance for quality control and reliable rejection of defected parts in an production line) will hardly be accepted,” he writes.
Another issue, says Holmes, is that existing commercially available instruments are aimed primarily at scientists or clinicians. “In particular, they are not really designed to quickly produce metrology measurements,” he says.
MDL is working to address this issue, as is Thorlabs, whose next-generation system, now in development, promises 140 kHz imaging. “We would like to move the display routine to a graphics card to reduce the CPU load and be able to display in parallel to acquisition and processing,” says Davis. “Using this model, we have recently achieved seven volumes per second real-time 3-D imaging.”
Stifter says OCT for nonbiomedical tasks is now only in its infancy. “Benefits from older concepts, which need re-evaluation with respect to the performance and availability of novel photonics components and devices can be expected,” he says. “Furthermore, added value from the combination of different measurement principles and complementary technologies will lead to new applications.”
REFERENCES
- osnsupersite.com/view.aspx?rid=39210
- Appl Phys B 88, p. 337 (2007).
About the Author

Barbara Gefvert
Editor-in-Chief, BioOptics World (2008-2020)
Barbara G. Gefvert has been a science and technology editor and writer since 1987, and served as editor in chief on multiple publications, including Sensors magazine for nearly a decade.


