Simple sensor characterizes surfaces
If Thoreau were an engineer, he might find his niche working at the Department of Engineering in Bilkent University (Ankara, Turkey), where researchers Billur Barshan and Tayfun Aytaç are working on a simple approach to the identification and localization of surfaces. The objective—recognizing a surface from its scatter characteristics and at the same time measuring its distance and angular orientation—could be achieved with a combination of sensors, one for each task. Instead, however, the Bilkent researchers use a lone single-point sensor—an inexpensive IR sensor normally used for basic tasks such as counting objects.1 The approach may have applications in robotics as well as manufacturing.
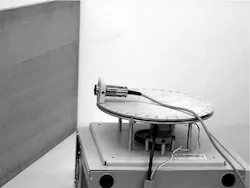
The IR sensor contains both an emitter and detector, with the detector window covered by an IR bandpass filter to reduce ambient light effects. The sensor is mounted on a rotary table (see figure). With the test surface nearby, the table is rotated once through a certain angular range (commonly 180°) and the return IR intensity is measured as a function of the table angle.
To enable identification of a surface that is a member of a predetermined set of surfaces, all surfaces within the set must first be scanned at preset distances to calibrate the instrument. Four surfaces were tested in the experiment: aluminum, white wall paint, brown kraft paper, and polystyrene packaging material. Aluminum is a specular reflector—all others reflect diffusely. The result of the calibrating scans is a set of return intensity curves for each of the four surfaces—each surface type produces a scan of a characteristic shape that scales in magnitude inversely with distance.
To identify the surface type, the test scan is compared to a reduced set of calibration scans via either a least-squares or a matched-filtering approach. Once matched to the proper surface type, the peak scan intensity determines the distance of the surface from the sensor. The angular position of the surface relative to the sensor is determined by the angular position of the intensity peak. Test distances ranged from 12.5 to 57.5 cm, while azimuths ranged from -45° to 45°.
Because the specular qualities of aluminum are distinctive, the aluminum surface was identified with 100% accuracy. For all surfaces, the average identification accuracy was 87% using matched filtering (the preferred approach). Accuracies of distance measurement averaged 1.2 cm and azimuth estimation averaged 1.0° for matched filtering. Because the IR emitter shone at the same intensity throughout the experiment, some scans saturated the detector for certain angles, while others returned a low intensity even at peak—both effects may reduce the accuracy of range and azimuth estimations, as well as identification. With other sensor designs or additional circuitry, automated adjustment of the emitted light could be realized, notes Barshan.
"The method is applicable for differentiation in either simple, controlled environments (for example, manufacturing) or for simple tasks in complex environments (such as counting or differentiating objects passing from left to right on a conveyor belt)," says Barshan. "Other possibilities include mobile-robot applications such as map building, finding and counting doorways, and so on as the robot moves down a corridor." (In map building, a mobile robot explores and charts its surroundings.)
The research is an outgrowth of an earlier study that used a similar sensor setup to differentiate between targets of different geometries (for example, planes, corners, edges, and cylinders).2 In that earlier work, differentiating between the various shapes occurred with a much higher 97% accuracy, illustrating the difficulties of surface identification.
REFERENCE
- B. Barshan and T. Aytaç, Opt. Eng. 42(12) (December 2003).
- T. Aytaç and B. Barshan, Opt. Commun. 210 (1-2) 25 (2002).

