ARTUR G. OLSZAK, JOANNA SCHMIT, and MONTEITH G. HEATON
Interferometry is a versatile measurement technology for examining surface topography with very high precision. At the heart of interferometry is the interferogram, which is the recorded interference signal of two beams of light exiting from the same source. An interferogram carries a wealth of information about the profile of an object under test and its material characteristics; its fringes, like lines on a topographic map, represent the topography of the object. Commonly, a charge-coupled-device detector registers the interferogram and forwards the frame to the computer for processing using interferometric phase-mapping programs.1
Techniques have been developed to retrieve a wide range of information from the object under test. These match a specific interferometric setup and interferogram analysis algorithm to the object itself and the kinds of information required. The most popular interferometric measurement techniques are phase-shifting interferometry (PSI), vertical scanning interferometry (VSI), and enhanced VSI (EVSI).2, 3, 4
Techniques and their strong points
Phase-shifting interferometry, which uses a monochromatic light source, is typically used to test smooth surfaces and is very accurate, resulting in vertical measurements with subnanometer resolution. The monochromatic light source that yields similar contrast fringes at each point in the interferogram also limits the range within which continuous fringes can be tracked. Phase-shifting interferometry cannot obtain a correct profile for objects that have large, steplike height changes; in addition, this method becomes ineffective when height discontinuities between adjacent pixels exceed one quarter of the used wavelength (l/4).
Rough-surfaced objects and those with adjacent pixel height difference of greater than l/4, or about 150 nm, are better measured using other techniques that can handle the greater surface roughness and height difference; however, these techniques result in lower-resolution measurements. One method that partially overcomes the height difference limitation is multiple-wavelength interferometry (MWI). This technique, in which two wavelengths are preselected, allows for subnanometer resolution while extending the dynamic range, which in MWI is the measurable height difference between two adjacent points. However, this method does not work well with rough surfaces.
For rough surfaces, a white-light VSI approach is effective because the light source is better-suited for the application, and we are no longer looking at the shape of the fringes but rather are looking for the best-focus position. However, VSI yields precision in the nanometer range rather than the subnanometer range provided by PSI and MWI. Because of the wide spectral bandwidth of the source (halogen lamp, filtered light from halogen lamp, LED, or other), the coherence length in VSI is short and good contrast fringes are obtained only when the two path lengths of the interferometer are closely matched. The interferometer is aligned so that the interference-intensity distribution along the vertical scanning direction has its peak (best-contrast fringes) at the best-focus position. Many algorithms exist to analyze white-light interferograms, but in general all detect the coherence peak. In short, PSI and MWI techniques have excellent resolution but limited dynamic ranges, whereas VSI has a wider dynamic range but lower resolution.
Recently, aspects of PSI and VSI have been combined to take advantage of the strengths of each approach; this new method is often called white-light phase-shifting interferometry or enhanced VSI. First, for each pixel of the detector, the best-focus frame position is found by locating the best contrast of interference-intensity distribution along the vertical scanning direction. Second, the PSI technique is applied to intensity distribution around the peak to achieve high-resolution measurement.
Interference microscopy
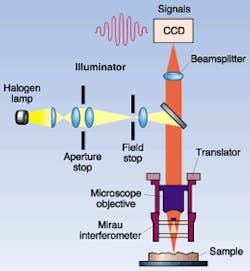
Interference microscopy combines an interferometer and microscope into one instrument and is used for measuring engineering surfaces that demand testing with high resolving power. Interference microscopy uses three types of interferometric objectives: Michelson, Mirau, and Linnik (all are modifications of the Michelson interferometer). In a Michelson interferometer objective, which is used for small magnifications, a beamsplitter cube and reference mirror are inserted between the objective and the tested surface. At magnifications up to 50X, the working distance (the space between the last surface of the lens and the tested surface) becomes too small to squeeze in a beamsplitter cube; a Mirau interferometric objective is used instead (see Fig. 1). For magnifications of 100X and more, requiring even smaller working distances, a Linnik interferometric objective is used. In the Linnik configuration, a beamsplitter cube directs the beam onto two objectives; one beam is directed to the reference mirror and the other is directed to the test surface.
Applications
Surface metrology is one of the main applications of interferometry. Microscope-based white-light profilers are capable of mapping up to a 10-mm-wide area in a single measurement with subnanometer resolution, providing instantaneous information about surface roughness, shape, and waviness. When larger areas need to be measured, a stitching procedure can be used in which a number of partially overlapping measurements are combined into one surface profile. The lateral resolution of an interferometer is defined by the optical system and the wavelength; this resolution can be as good as 300 nm. Several interferometric measurement modes can be used, each of which has its particular strengths, though there is some overlap among their capabilities.
As mentioned previously, PSI yields the highest accuracy of all modes. With angstrom-level vertical resolution and high lateral resolution, PSI is typically used to characterize high-quality surfaces such as dense wavelength-division-multiplexing filters, wafers, and so on. Short measurement time (less than 0.5 s) makes PSI particularly appropriate for high-volume automated quality control.
Vertical scanning interferometry is used to characterize surfaces with higher roughness and/or discontinuities, such as steps, cavities, islands, and so on. Heights up to several millimeters can be resolved, though measurement time is longer (several seconds to a minute) due to the added vertical scan length. The technique is accurate down to single nanometers, making the method well-suited for applications in microelectromechanical systems (MEMS) and semiconductor measurements. Several important process parameters can be easily measured using VSI. When combined with high-numerical-aperture (NA) lenses such as a 100X Linnik objective (NA of 0.95), it can be particularly attractive for characterizing such interferometrys as wall angles or vias. The same capability can be used for integrated optical circuits, waveguides, thick films, precision machined surfaces, and numerous other industrial measurements.Combining capabilities
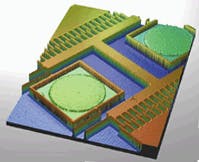
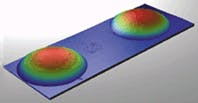
Enhanced VSI is capable of measuring the same heights and discontinuities as VSI but with resolution and repeatability similar to PSI. As with PSI, this method requires smooth surfaces with roughness below a hundred nanometers. The most important applications of this technology are in the telecommunications, MEMS, and semiconductor industries (see Fig. 2). The technique delivers subnanometer repeatability when measuring the surface of microlenses and microlens arrays—essential components of modern fiberoptic-network devices. The sag of a microlens surface can reach several tens of microns for diameters as small as a few hundred microns. Characterization of these lenses requires the use of higher magnification, in which case the PSI technique is not feasible because of the small depth of focus. On the other hand, VSI-related methods have significant noise when related to the surface roughness. By combining the quality of measurement of PSI with VSI's dynamic range, EVSI provides precise characterization of the lens surface. Its high precision allows measurement of parameters such as departure from sphericity, radius of curvature, and so on (see Fig. 3).Interferometric systems have been successfully used to investigate dispersion of materials, complex indices of refraction, and thermal properties. The instruments can also provide dynamic measurement capability, such as the analysis of resonant frequencies of structures, three-dimensional motion mapping, and more. New applications are emerging in biotechnology and material sciences. The high vertical resolution, lateral resolution, throughput, and repeatability of optical instruments provide a good complement to other techniques such as atomic-force microscopy and projection-shape measurement.
REFERENCES
- P. Hariharan, "Interferometers," Handbook of Optics (McGraw-Hill Companies Inc., New York; 1996).
- K. Creath, "Temporal Phase Measurement Methods," Interferogram Analysis (Institute of Physics Publishing Ltd., Bristol; 1993).
- K. G. Larkin, J. Opt. Soc. Am. A 13, 832 (1996).
- A. Harasaki, J. Schmit, and J. C. Wyant, Appl. Opt. 39, 2107 (2000).
Artur G. Olszak and Joanna Schmit are senior optical engineers, and Monteith G. Heaton is director of marketing at Veeco Metrology Group, 2650 East Elvira Rd., Tucson, AZ 85706-7123; e-mail: [email protected].


