New way to produce diamond-turned mirrors situates them early on
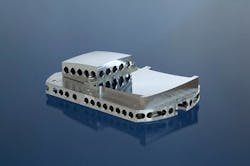
Jena, Germany--Researchers at the Fraunhofer Institute for Applied Optics and Precision Engineering (IOF) have worked out a way to produce diamond-turned telescope mirrors to what they say is a better surface figure and mirror-to-mirror positional accuracy. Mirrors have been built for an IR sounder telescope (IRS-TEL) using the technique. (The photo shows the telescope's M2/M3 assembly with two exactly aligned aspherical mirrors produced using the technique.)
Optics for certain space-research, climate-observation, and weather-forecasting satellites consist of several aspherically shaped mirror elements that form a telescope. "All the mirrors must be produced and characterized with extreme precision, that is to an accuracy of less than one micrometer," explains Sebastian Scheiding of the IOF. "They also have to be exactly positioned in relation to each other."
Until now this positioning has been very time-consuming, as it takes place step by step. First, the individual mirrors are fitted in the telescope one after the other, then the imaging quality is measured. If errors are found, they are corrected by positional adjustments to the mirrors. Then further measurements and adjustments are made until all components are optimally arranged.
Optics positioned together during diamond-turning
"We wanted to simplify this complicated and time-consuming adjustment process," says Scheiding. In the research project, which was initiated by the German Aerospace Center (DLR), Scheiding developed an new production technique which takes into account the later alignment of the components right from the outset. For this purpose, the individual mirror surfaces are positioned in relation to each other as precisely during processing as they will be later in the telescope. This reduces to a minimum the errors and corrections made when the mirrors are being fitted. The assembly process is simple and reproducible.
"The trick is that we mount all the mirrors for a module in the same machine at the same time and assign them to a common system of coordinates. To this end, each mirror blank is provided with defined, ultraprecise measurement marks and reference surfaces," says Scheiding.
The fixed marks define the coordinate system for diamond-turning of the mirror shapes. At the same time, however, they fix the position of each mirror in relation to the adjacent mirrors. Finally they also serve as reference points for subsequent measurement processes to check the quality of the optical system.
The mirror arrangement for the IRS-TEL contains two mirror modules, each of which has two juxtaposed aluminum mirror surfaces. The shape of the metal mirror deviates a maximum of 126 nm from the ideal aspherical shape and the position of two mirrors in relation to each other is said to be ten times more precise than for comparable conventionally produced mirror assemblies.
Less expensive too, says IOF
"As a result, we can make optical systems of this type to a far greater degree of accuracy, but at the same time we're cheaper because the time-consuming adjustment process during final assembly is no longer required," says Scheiding.
The IOF's mirror module is on display at Hall 3, Stand D50 at the OPTATEC international optical trade show from June 15 to 18 (Frankfurt, Germany).
About the Author
John Wallace
Senior Technical Editor (1998-2022)
John Wallace was with Laser Focus World for nearly 25 years, retiring in late June 2022. He obtained a bachelor's degree in mechanical engineering and physics at Rutgers University and a master's in optical engineering at the University of Rochester. Before becoming an editor, John worked as an engineer at RCA, Exxon, Eastman Kodak, and GCA Corporation.

